
-
 客服电话
客服电话
-
 APP下载
APP下载
迪恩网络APP
随时随地掌握行业动态

-
 官方微信
官方微信
扫描二维码
关注迪恩网络微信公众号
客服电话
APP下载
迪恩网络APP
随时随地掌握行业动态
官方微信
扫描二维码
关注迪恩网络微信公众号
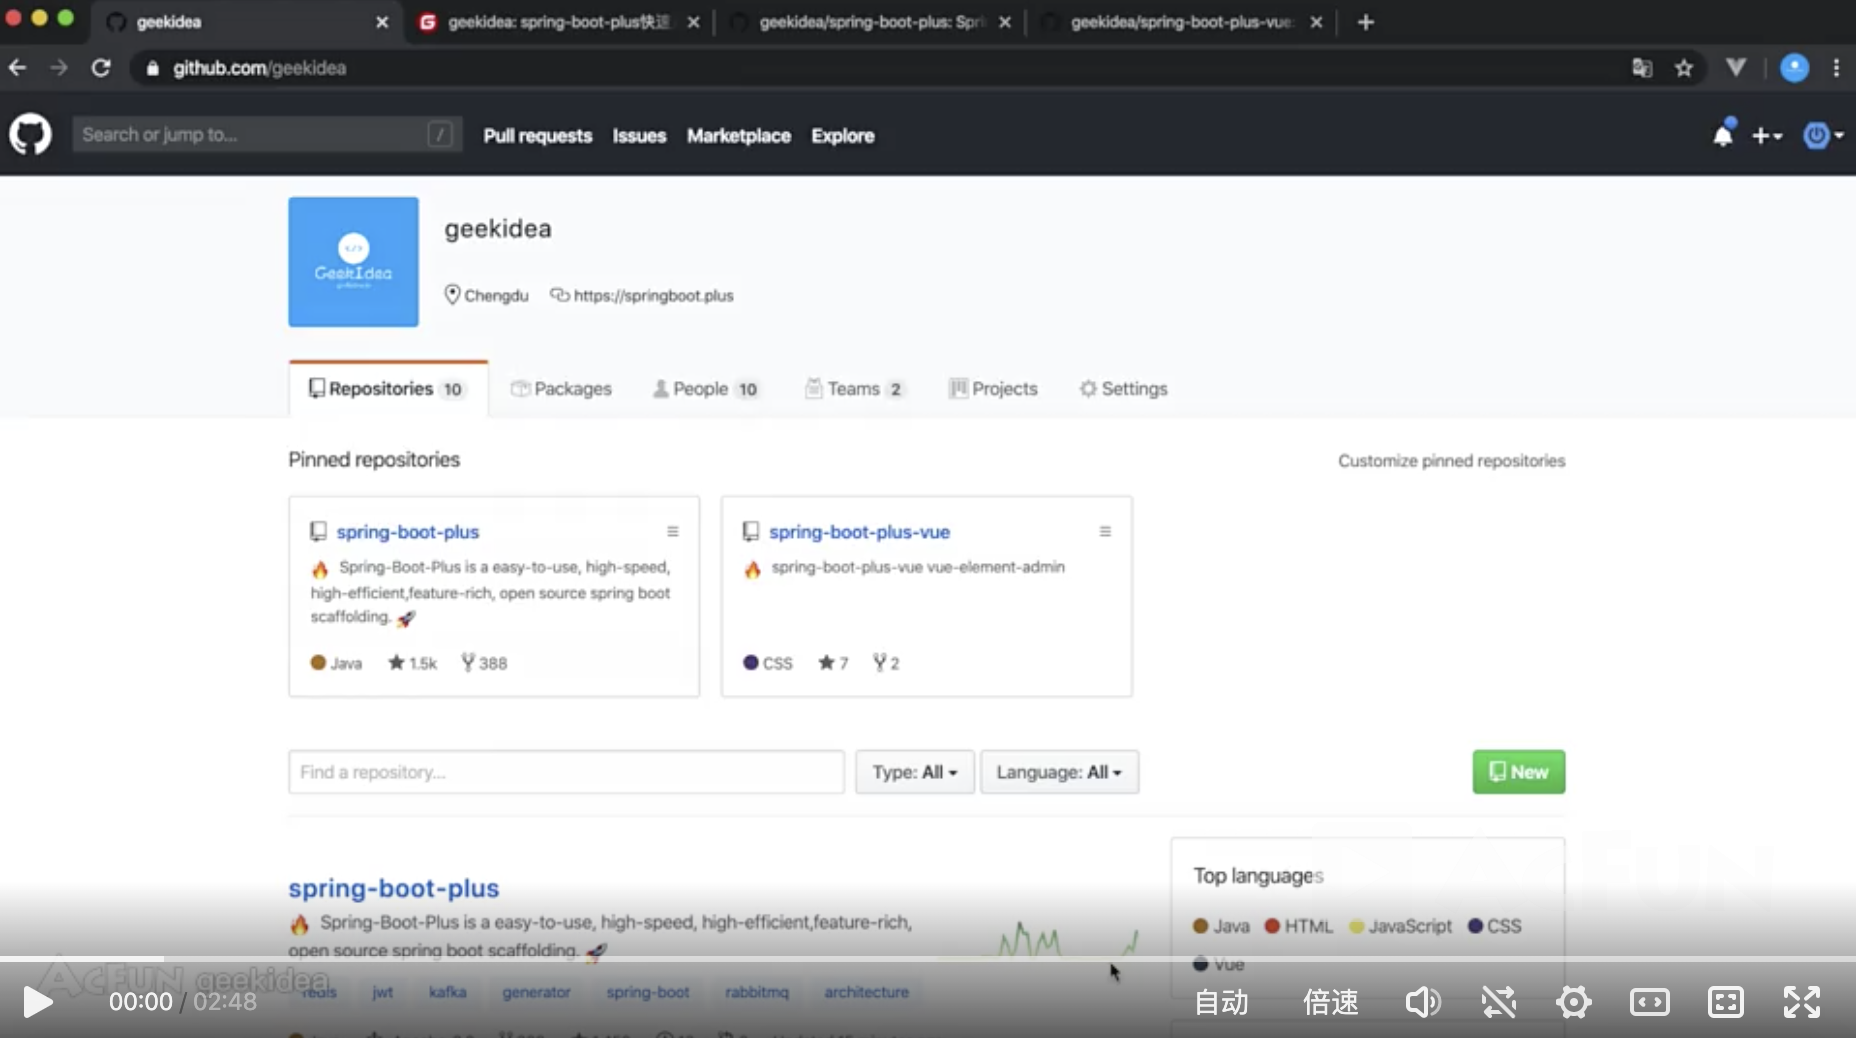
开源软件名称:spring-boot-plus开源软件地址:https://gitee.com/geekidea/spring-boot-plus开源软件介绍: Everyone can develop projects independently, quickly and efficiently! spring-boot-plus是一套集成spring boot常用开发组件的后台快速开发框架
目标
GITHUB | GITEEspringboot.plus主要特性
V2.0视频介绍 项目结构 └── spring-boot-plus ├── admin SpringBootAdmin Server模块 ├── bootstrap spring-boot-plus 启动模块 ├── config 配置模块 ├── distribution 打包模块 ├── docs 文档目录 ├── example 示例模块,自己的业务可新建多个模块处理 ├── framework 框架核心模块 ├── generator 代码生成模块 ├── scheduled 任务调度模块 └── system 系统模块项目环境
技术选型
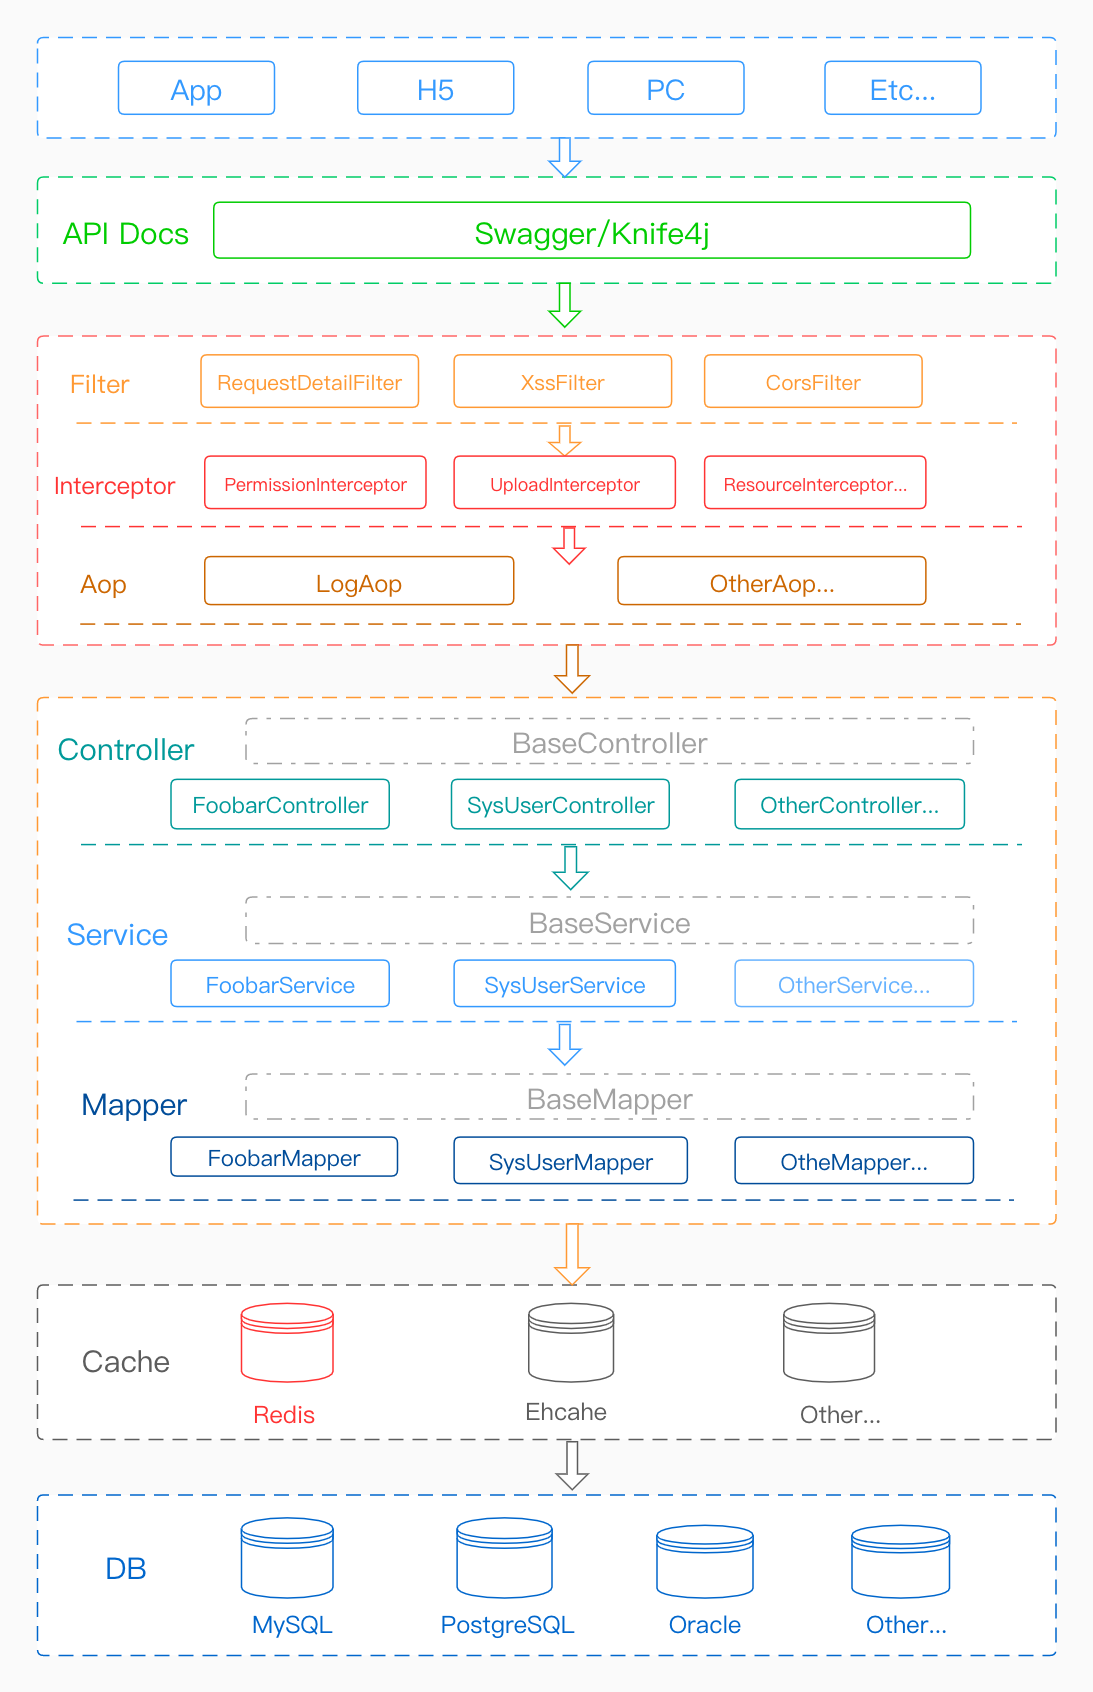
项目链路图
CHANGELOG快速开始克隆 spring-boot-plusgit clone https://gitee.com/geekidea/spring-boot-plus.gitcd spring-boot-plusMaven 构建
mvn clean package -Pdev5分钟完成增删改查1. 创建数据库表-- ------------------------------ Table structure for foo_bar-- ----------------------------DROP TABLE IF EXISTS `foo_bar`;CREATE TABLE `foo_bar`( `id` bigint(20) NOT NULL COMMENT '主键', `name` varchar(20) NOT NULL COMMENT '名称', `foo` varchar(20) DEFAULT NULL COMMENT 'Foo', `bar` varchar(20) NOT NULL COMMENT 'Bar', `remark` varchar(200) DEFAULT NULL COMMENT '备注', `state` int(11) NOT NULL DEFAULT '1' COMMENT '状态,0:禁用,1:启用', `version` int(11) NOT NULL DEFAULT '0' COMMENT '版本', `create_time` timestamp NULL DEFAULT CURRENT_TIMESTAMP COMMENT '创建时间', `update_time` timestamp NULL DEFAULT NULL COMMENT '修改时间', PRIMARY KEY (`id`)) ENGINE = InnoDB DEFAULT CHARSET = utf8mb4 COLLATE = utf8mb4_general_ci COMMENT ='FooBar';-- ------------------------------ Records of foo_bar-- ----------------------------INSERT INTO foo_bar (id, name, foo, bar, remark, state, version, create_time, update_time) VALUES (1, 'FooBar', 'foo', 'bar', 'remark...', 1, 0, '2019-11-01 14:05:14', null);INSERT INTO foo_bar (id, name, foo, bar, remark, state, version, create_time, update_time) VALUES (2, 'HelloWorld', 'hello', 'world', null, 1, 0, '2019-11-01 14:05:14', null);2.使用代码生成器生成增删改查代码
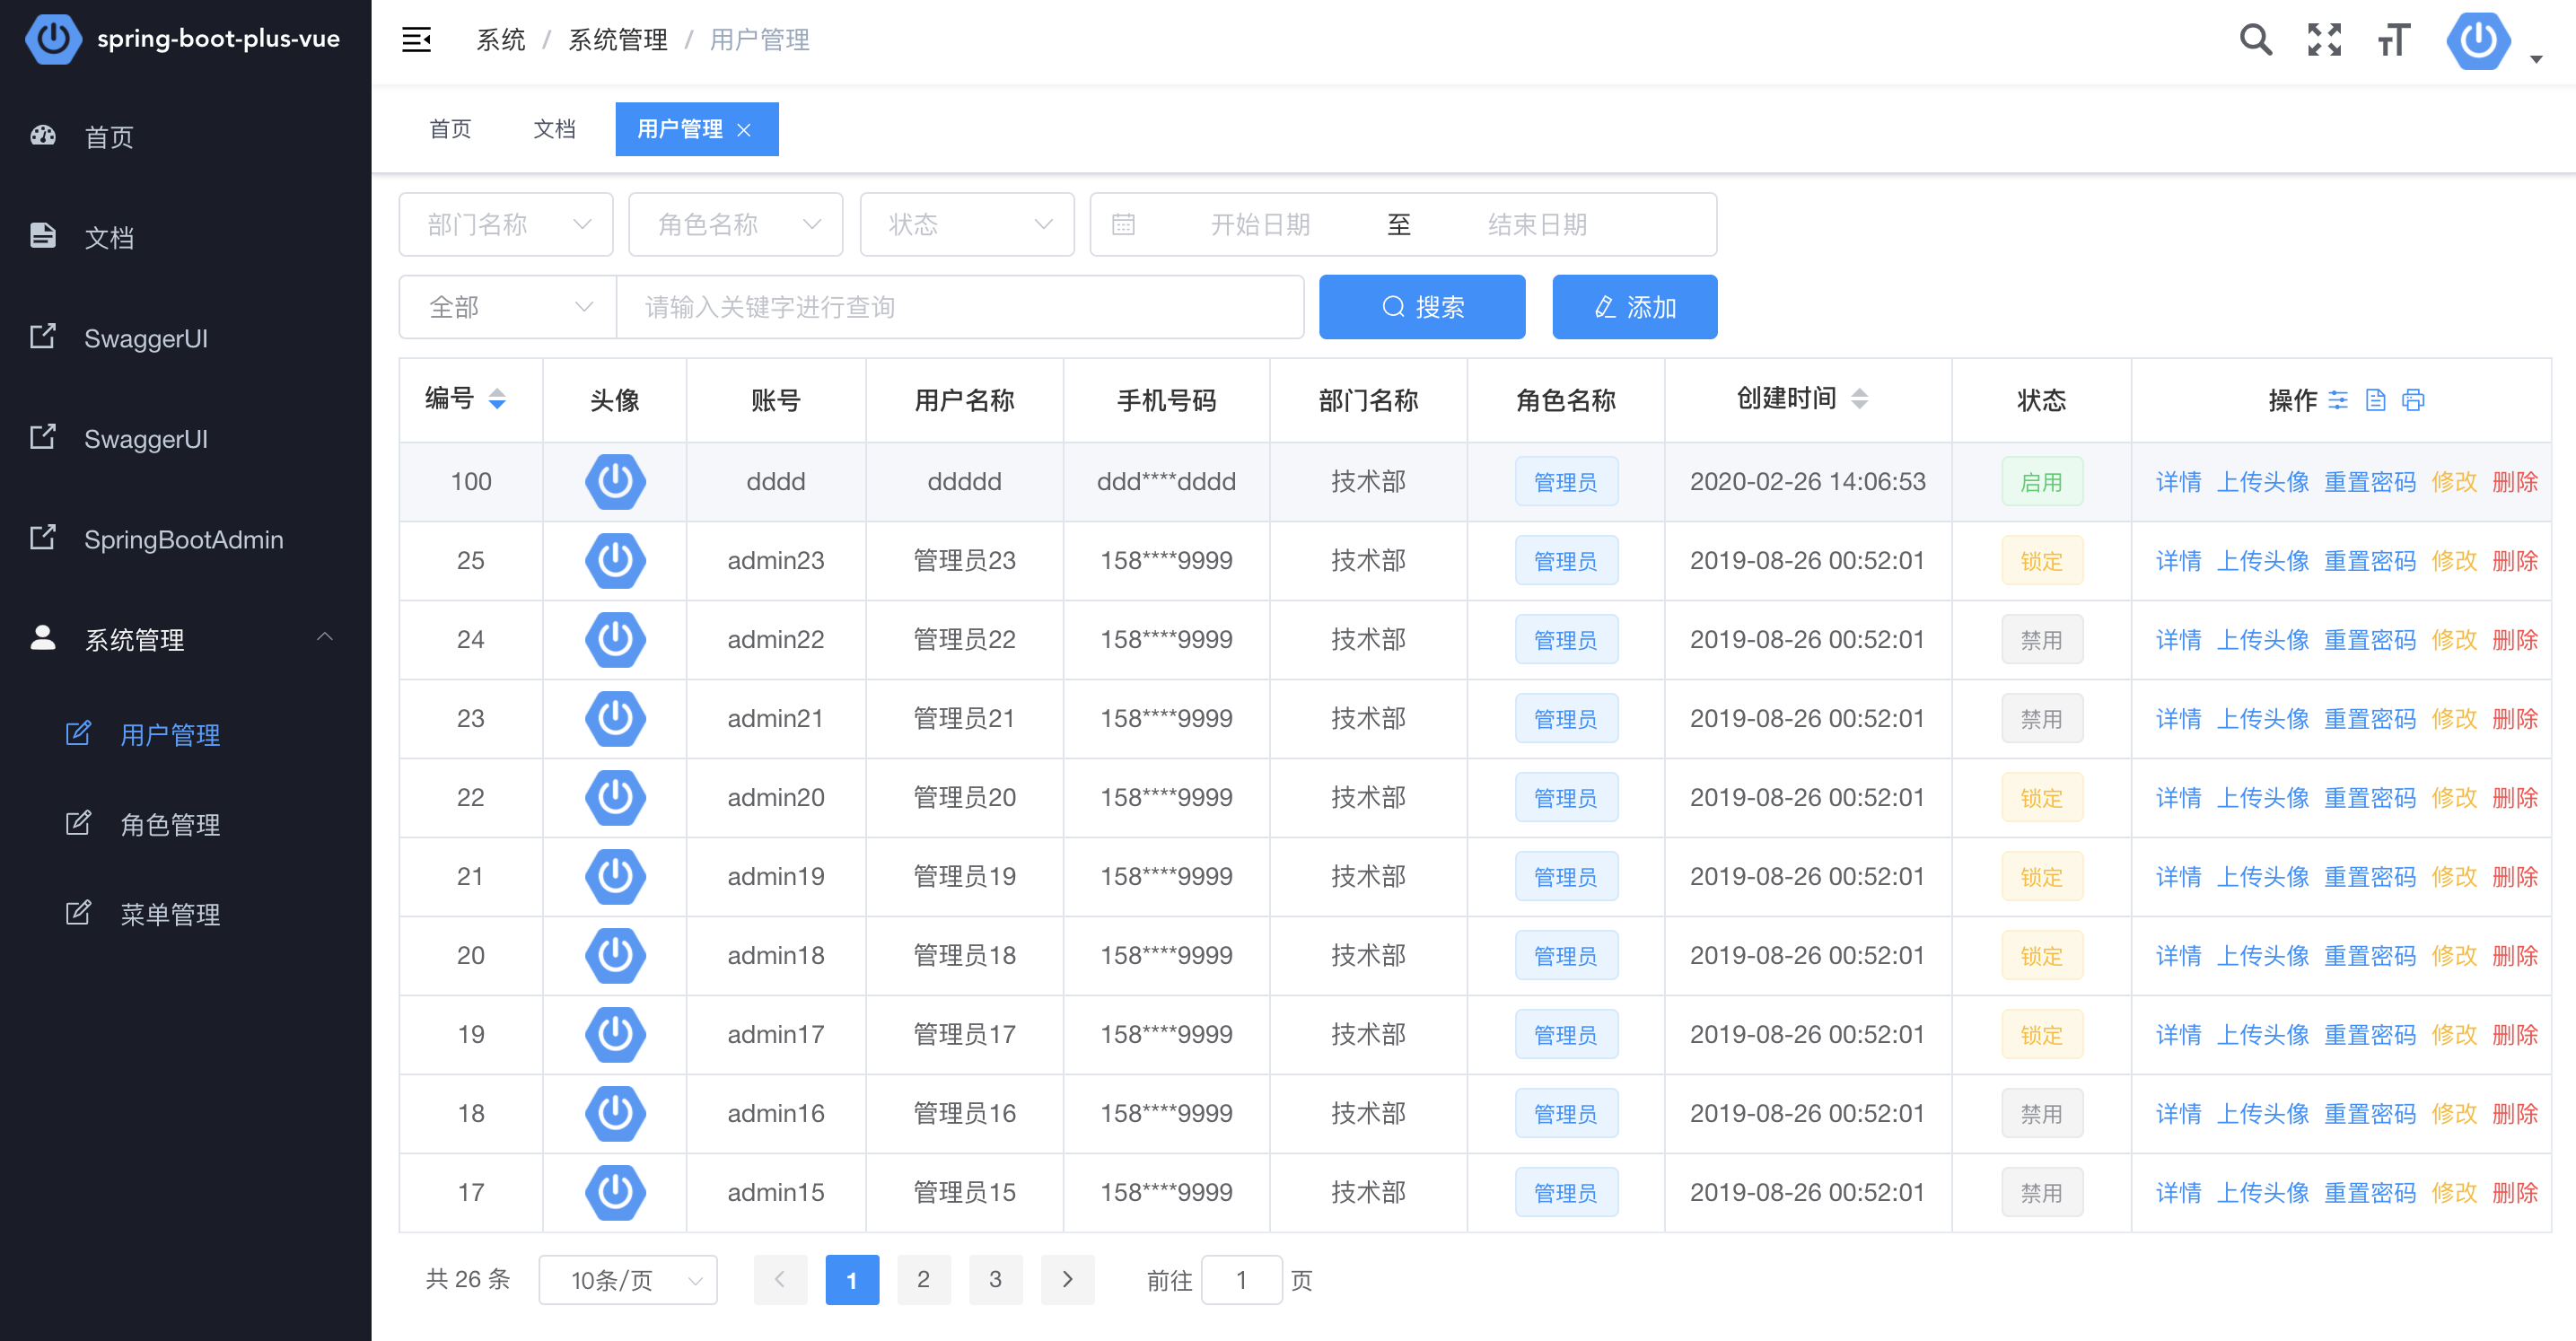
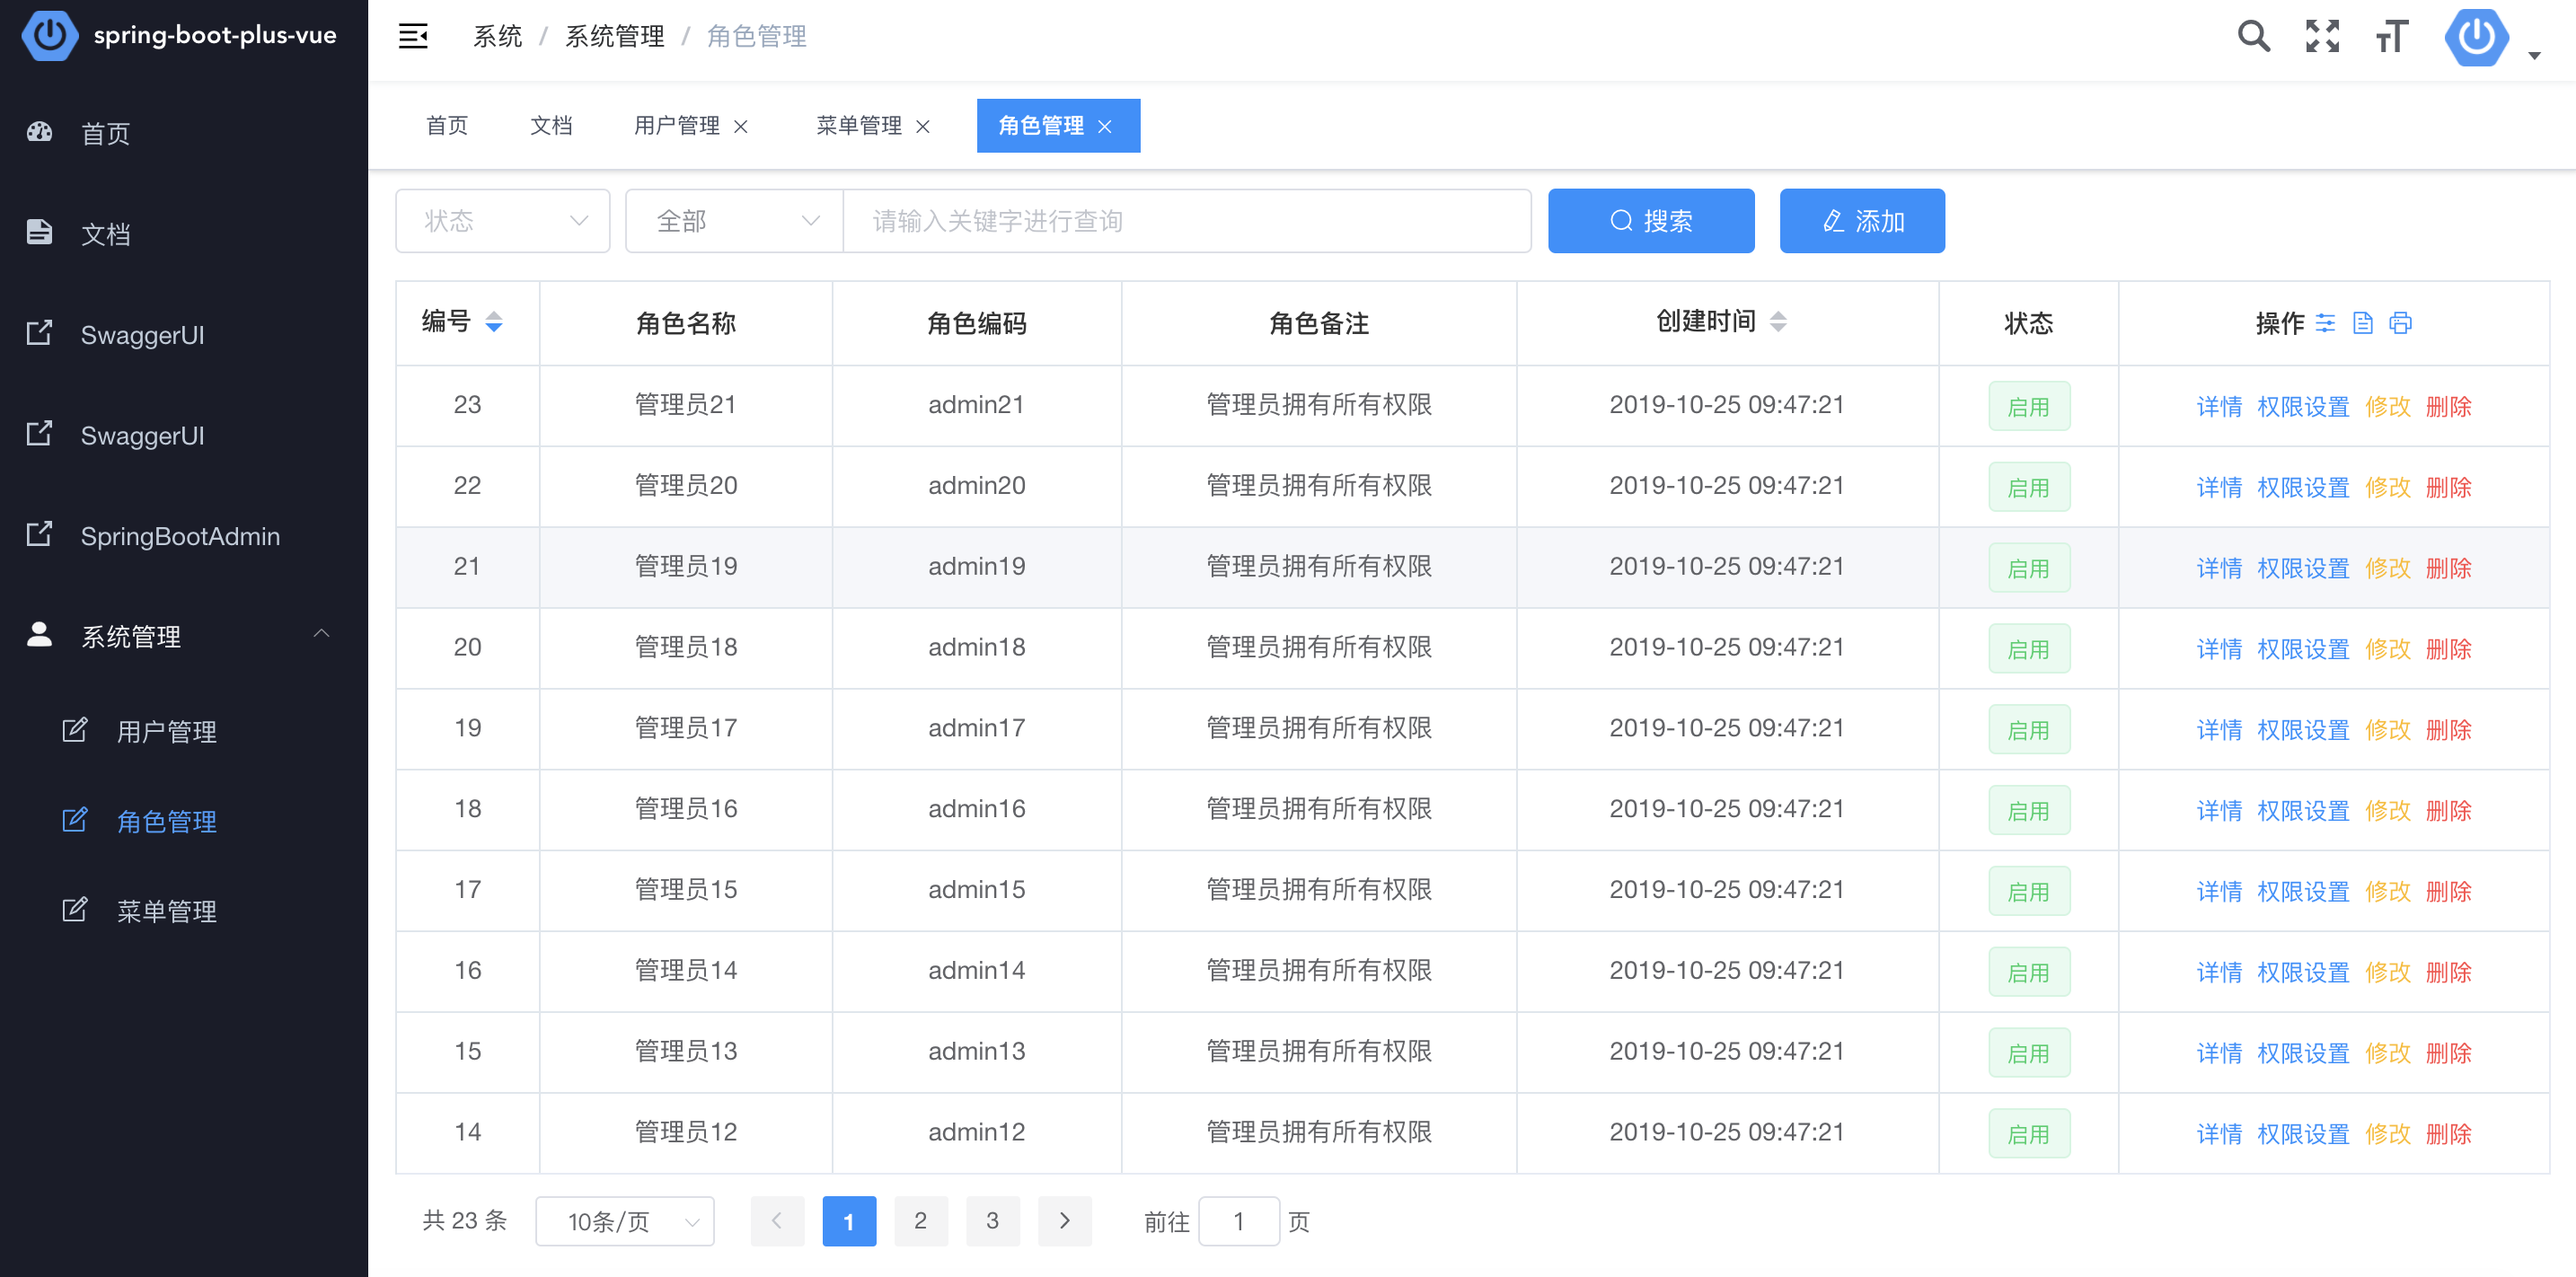
spring-boot-plus/generator/src/main/java/io/geekidea/springbootplus/generator/SpringBootPlusGenerator.java/** * spring-boot-plus代码生成器入口类 * * @author geekidea * @date 2019-10-22 **/@Componentpublic class SpringBootPlusGenerator { /** * 生成代码 * @param args */ public static void main(String[] args) { GeneratorProperties generatorProperties = new GeneratorProperties(); // 设置基本信息 generatorProperties .setMavenModuleName("example") .setParentPackage("com.example") .setModuleName("foobar") .setAuthor("geekidea") .setFileOverride(true); // 设置表信息 generatorProperties.addTable("foo_bar","id"); // 数据源配置 generatorProperties.getDataSourceConfig() .setDbType(DbType.MYSQL) .setUsername("root") .setPassword("root") .setDriverName("com.mysql.jdbc.Driver") .setUrl("jdbc:mysql://localhost:3306/spring_boot_plus?useUnicode=true&characterEncoding=UTF-8&useSSL=false"); // 生成配置 generatorProperties.getGeneratorConfig() .setGeneratorStrategy(GeneratorStrategy.SINGLE) .setGeneratorEntity(true) .setGeneratorController(true) .setGeneratorService(true) .setGeneratorServiceImpl(true) .setGeneratorMapper(true) .setGeneratorMapperXml(true) .setGeneratorPageParam(true) .setGeneratorQueryVo(true) .setRequiresPermissions(true) .setPageListOrder(true) .setParamValidation(true) .setSwaggerTags(true) .setOperationLog(true); // 全局配置 generatorProperties.getMybatisPlusGeneratorConfig().getGlobalConfig() .setOpen(true) .setSwagger2(true) .setIdType(IdType.AUTO) .setDateType(DateType.ONLY_DATE); // 策略配置 generatorProperties.getMybatisPlusGeneratorConfig().getStrategyConfig() .setNaming(NamingStrategy.underline_to_camel) .setColumnNaming(NamingStrategy.underline_to_camel) .setEntityLombokModel(true) .setRestControllerStyle(true) .setControllerMappingHyphenStyle(true) .setVersionFieldName(GeneratorConstant.VERSION) .setLogicDeleteFieldName(GeneratorConstant.DELETED); // 生成代码 CodeGenerator codeGenerator = new CodeGenerator(); codeGenerator.generator(generatorProperties); }}Code Generator Templates
spring-boot-plus/generator/src/main/resources└── templates ├── controller.java.vm 控制器代码生成模版 ├── entity.java.vm 实体类代码生成模版 ├── mapper.java.vm mapper代码生成模版 ├── mapper.xml.vm mapper xml 代码生成模版 ├── pageParam.java.vm 分页参数代码生成模版 ├── queryVo.java.vm 查询结果代码生成模版 ├── service.java.vm 服务接口代码生成模版 └── serviceImpl.java.vm 服务实现代码生成模版生成的代码结构└── src └── main ├── java │ └── com │ └── example │ └── foobar │ ├── controller │ │ └── FooBarController.java │ ├── entity │ │ └── FooBar.java │ ├── mapper │ │ └── FooBarMapper.java │ ├── param │ │ └── FooBarPageParam.java │ ├── service │ │ ├── FooBarService.java │ │ └── impl │ │ └── FooBarServiceImpl.java │ └── vo │ └── FooBarQueryVo.java └── resources └── mapper └── foobar └── FooBarMapper.xml3. 启动SpringBootAdmin
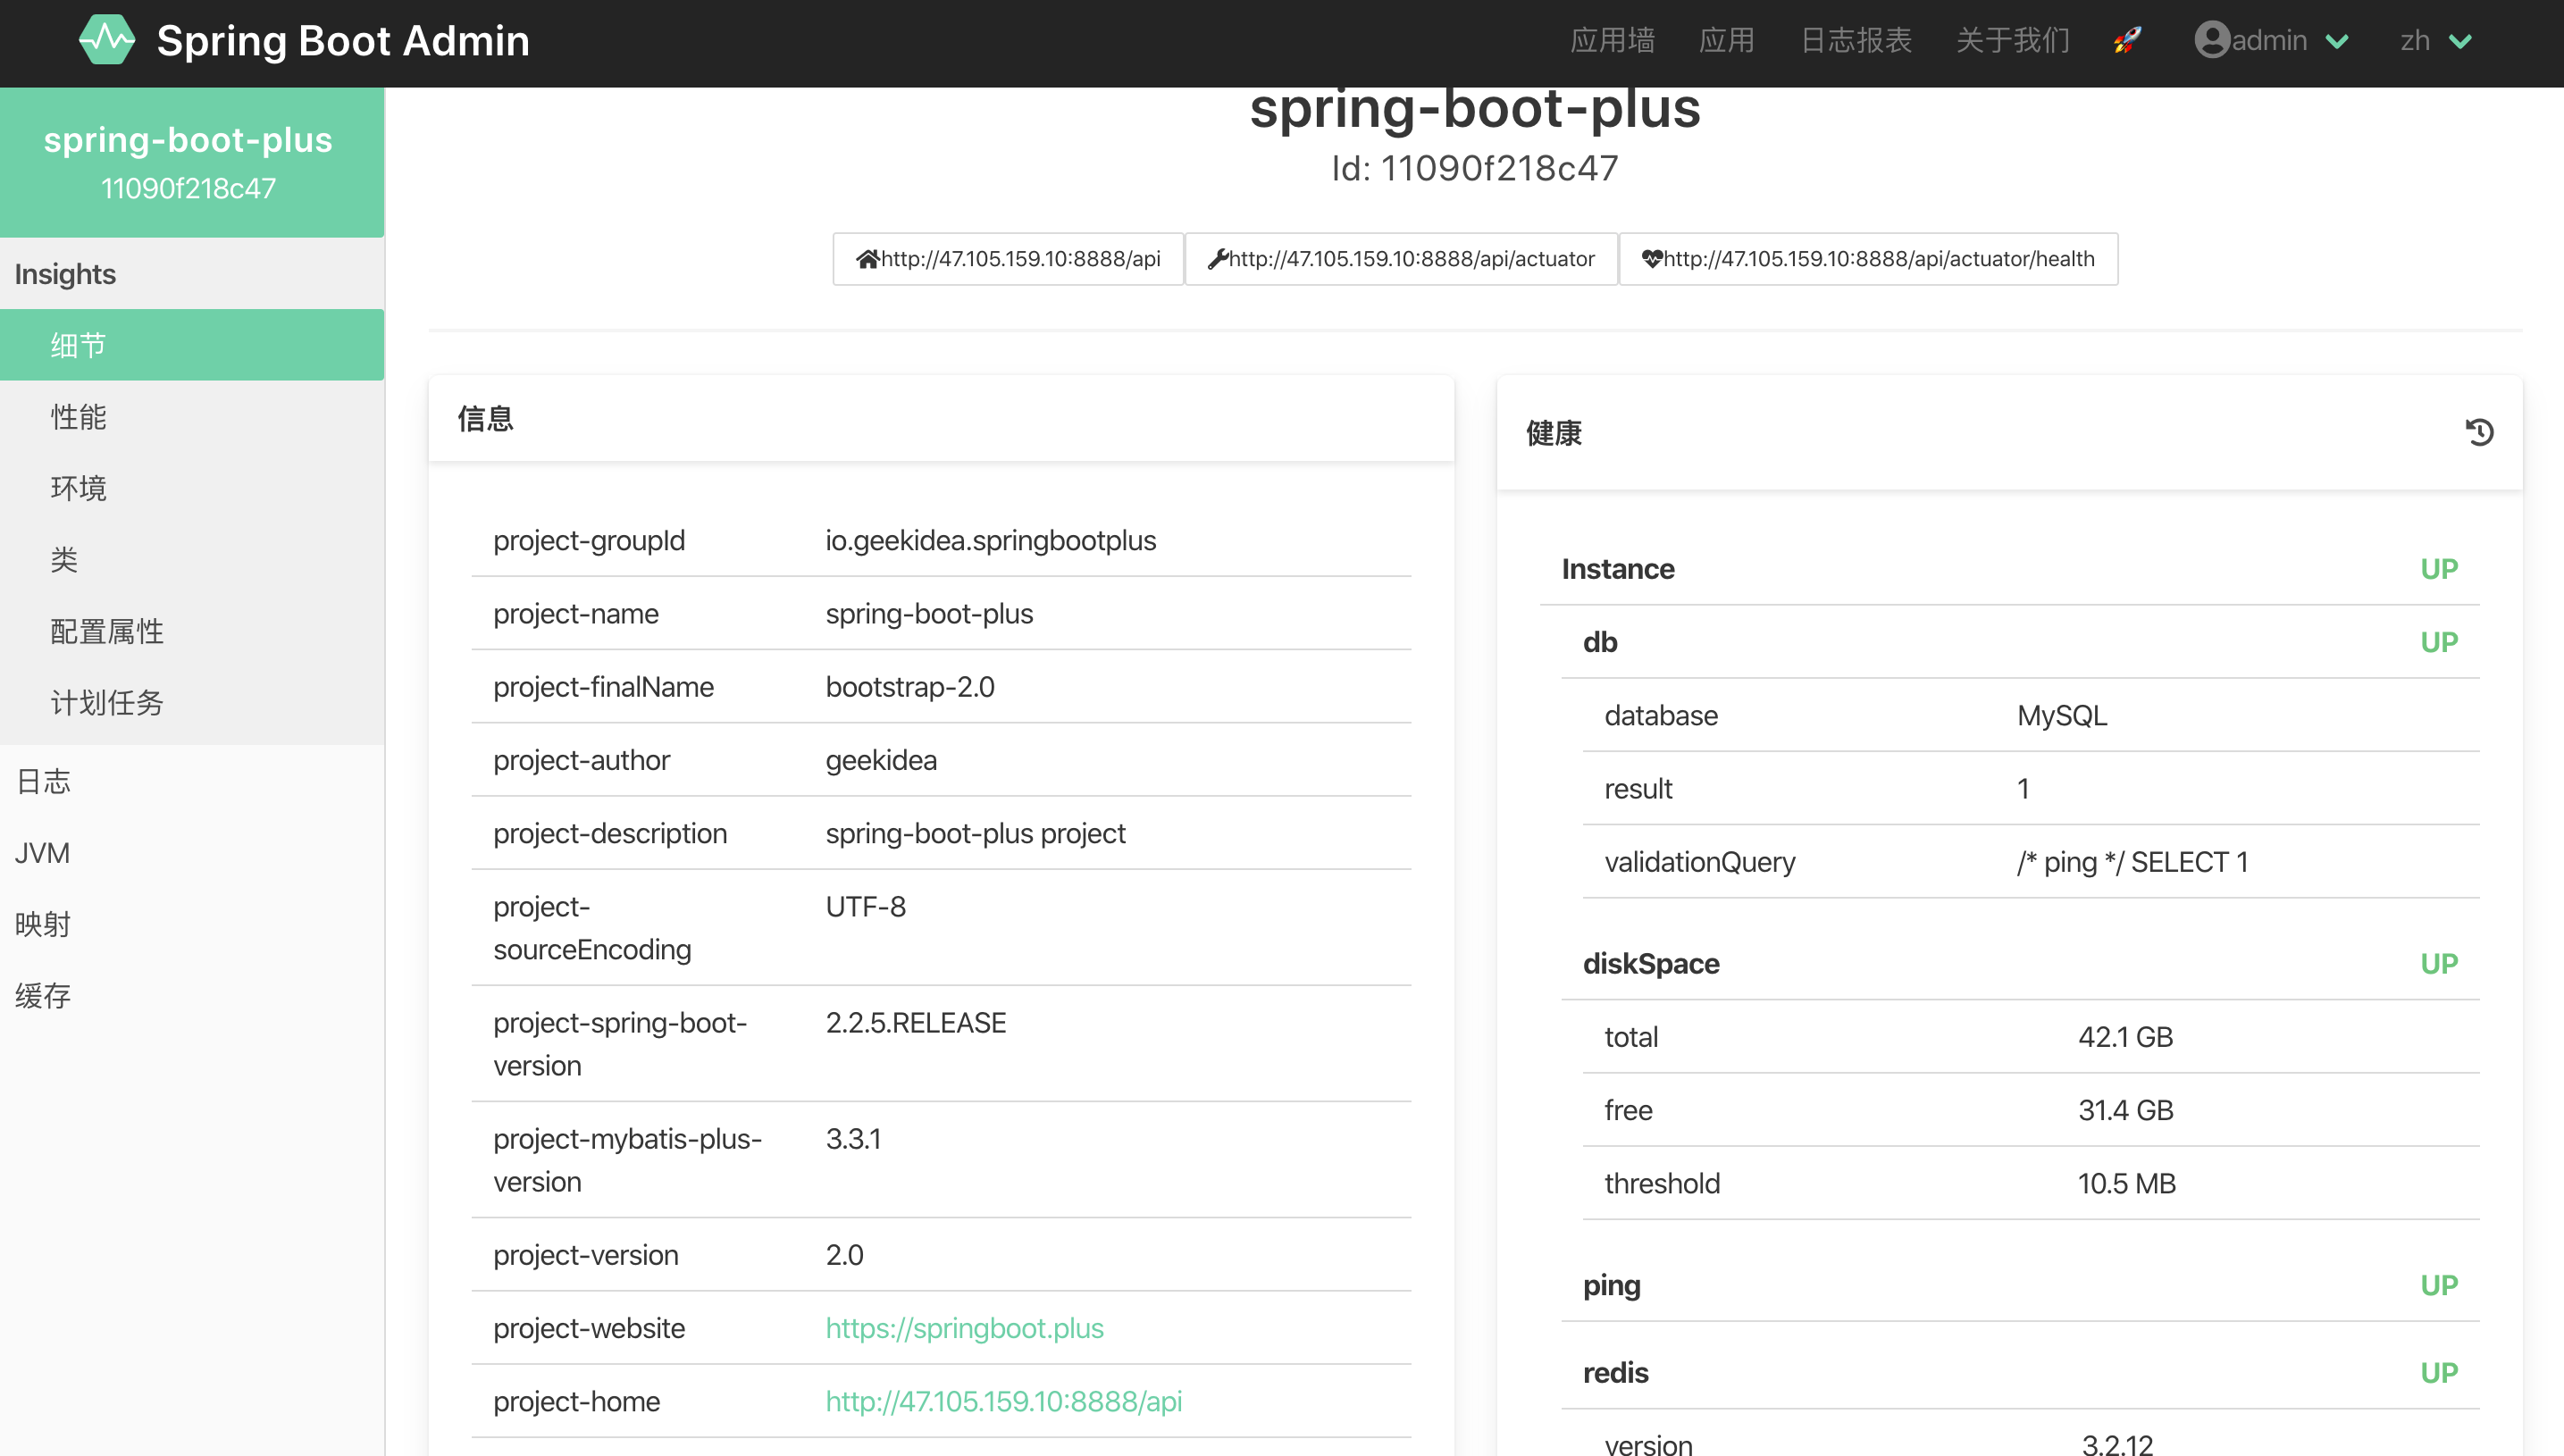
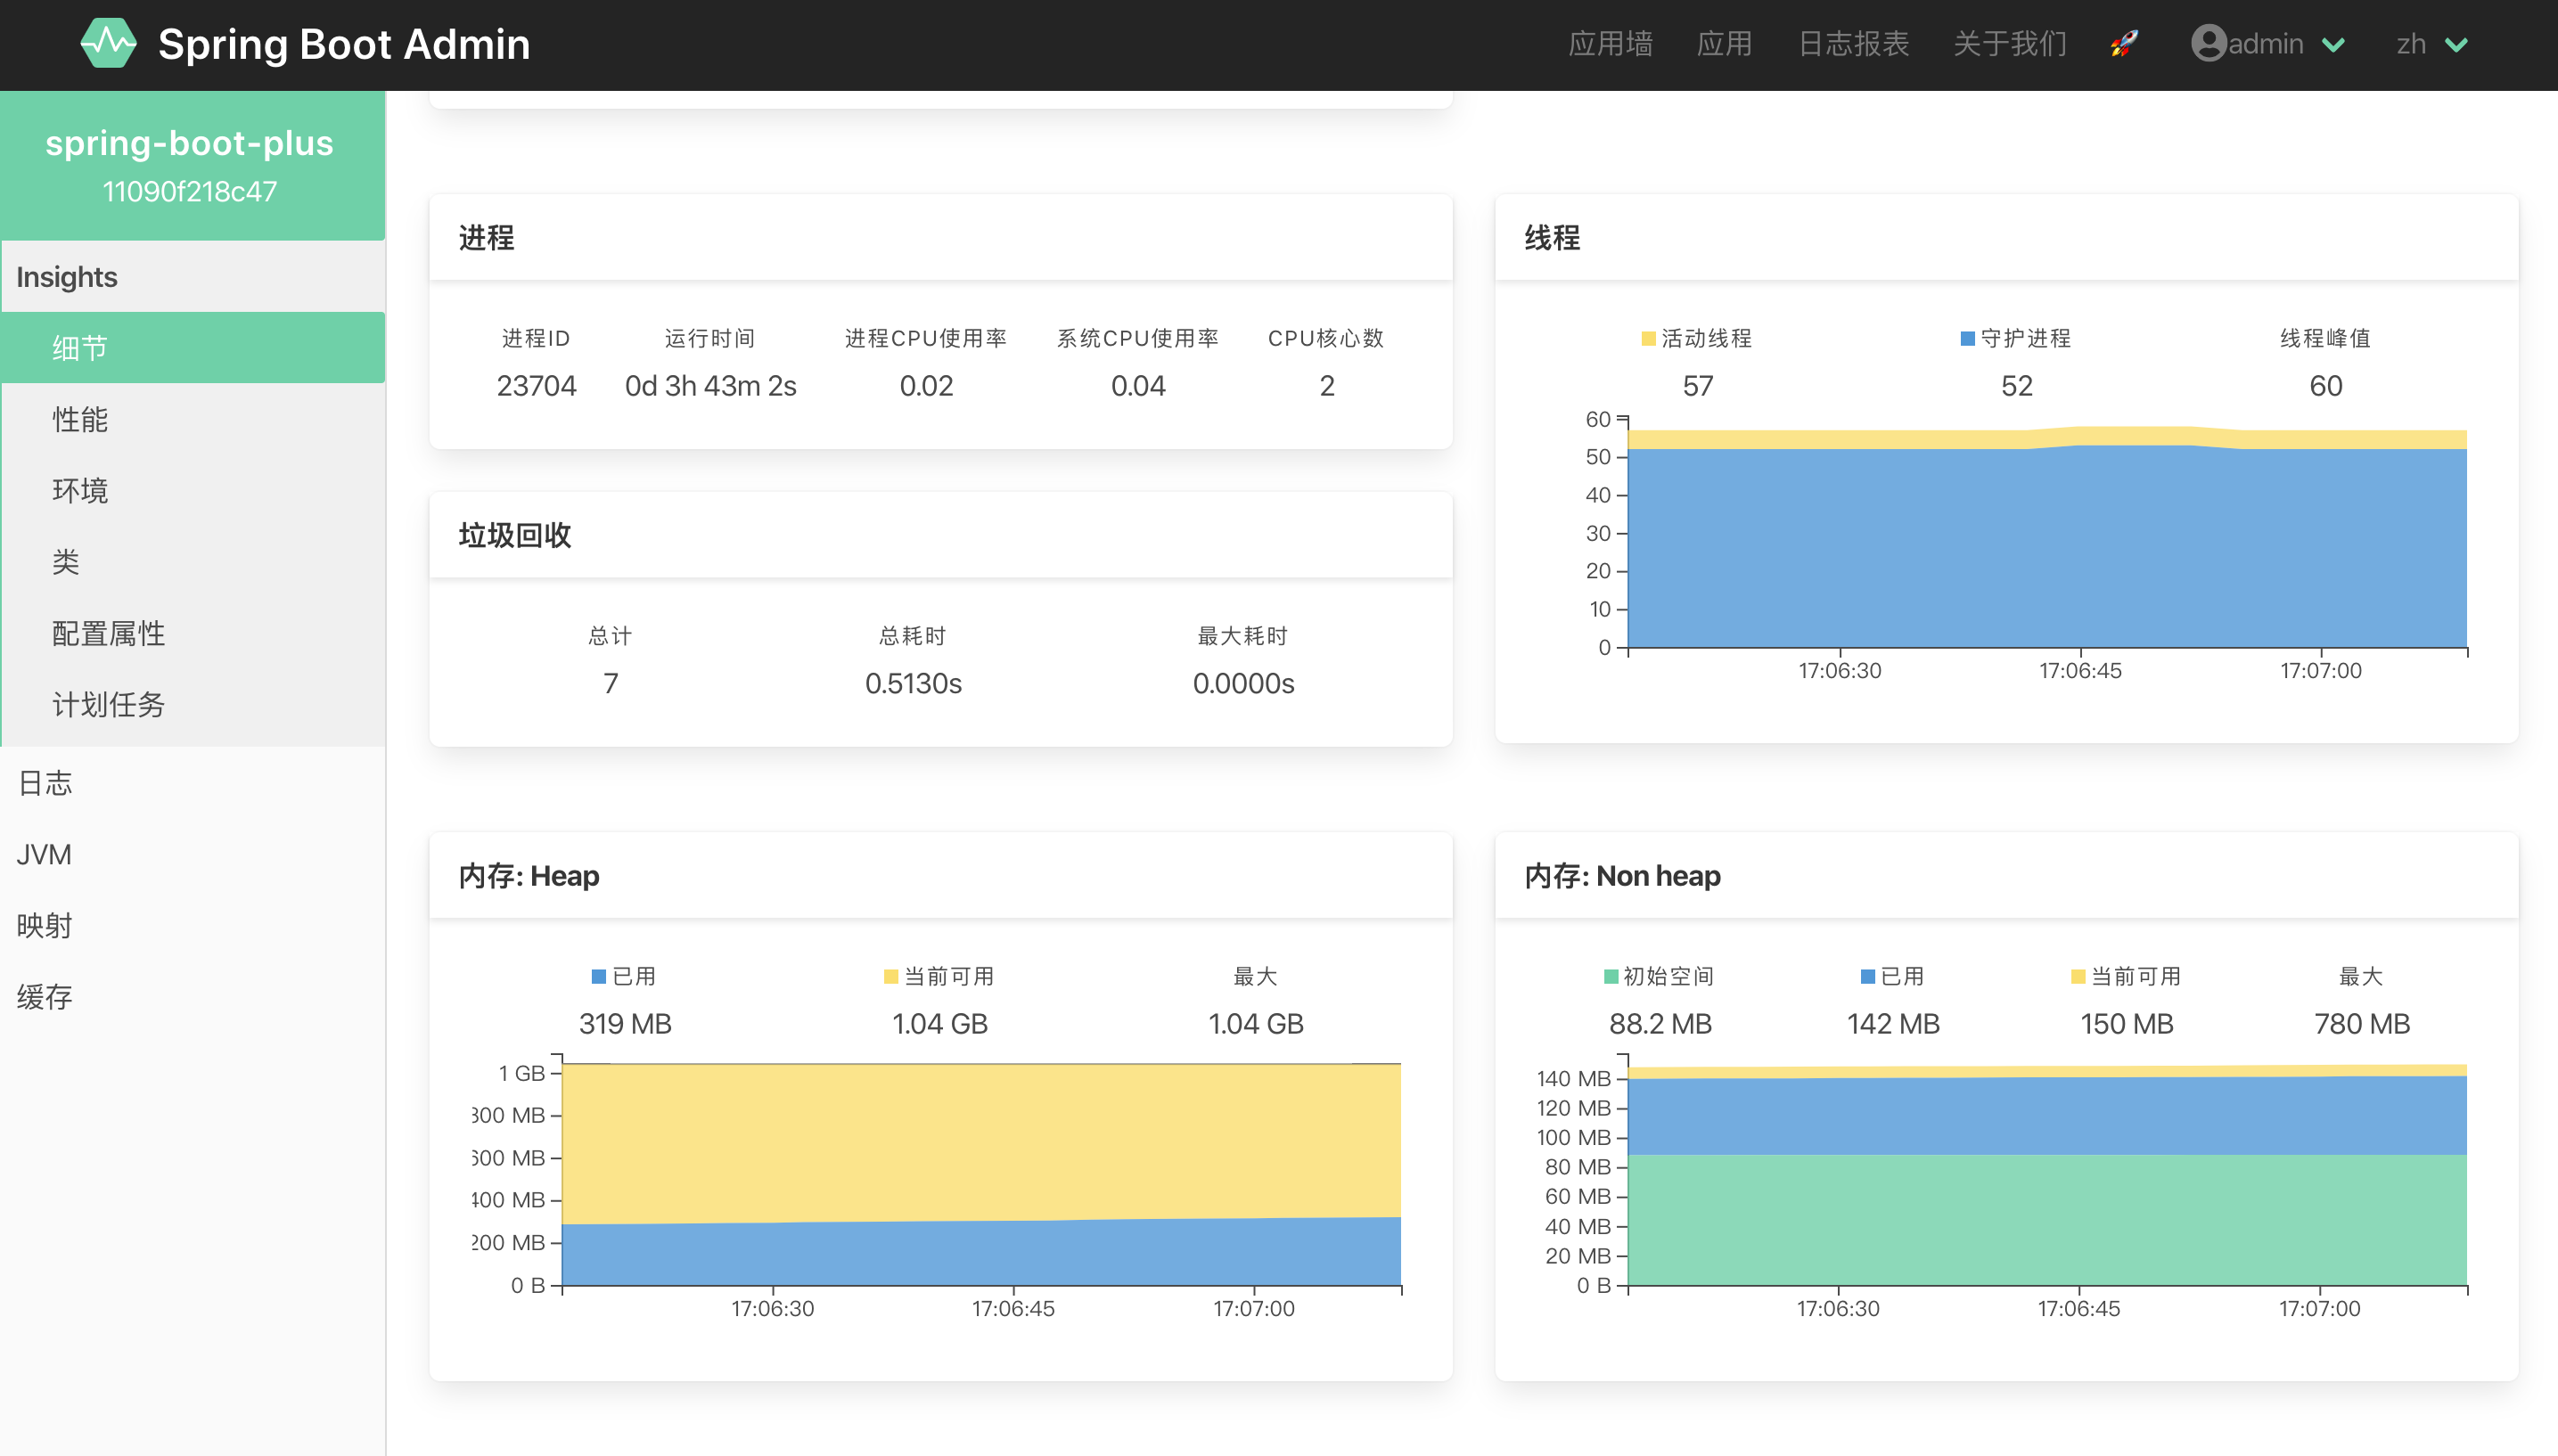
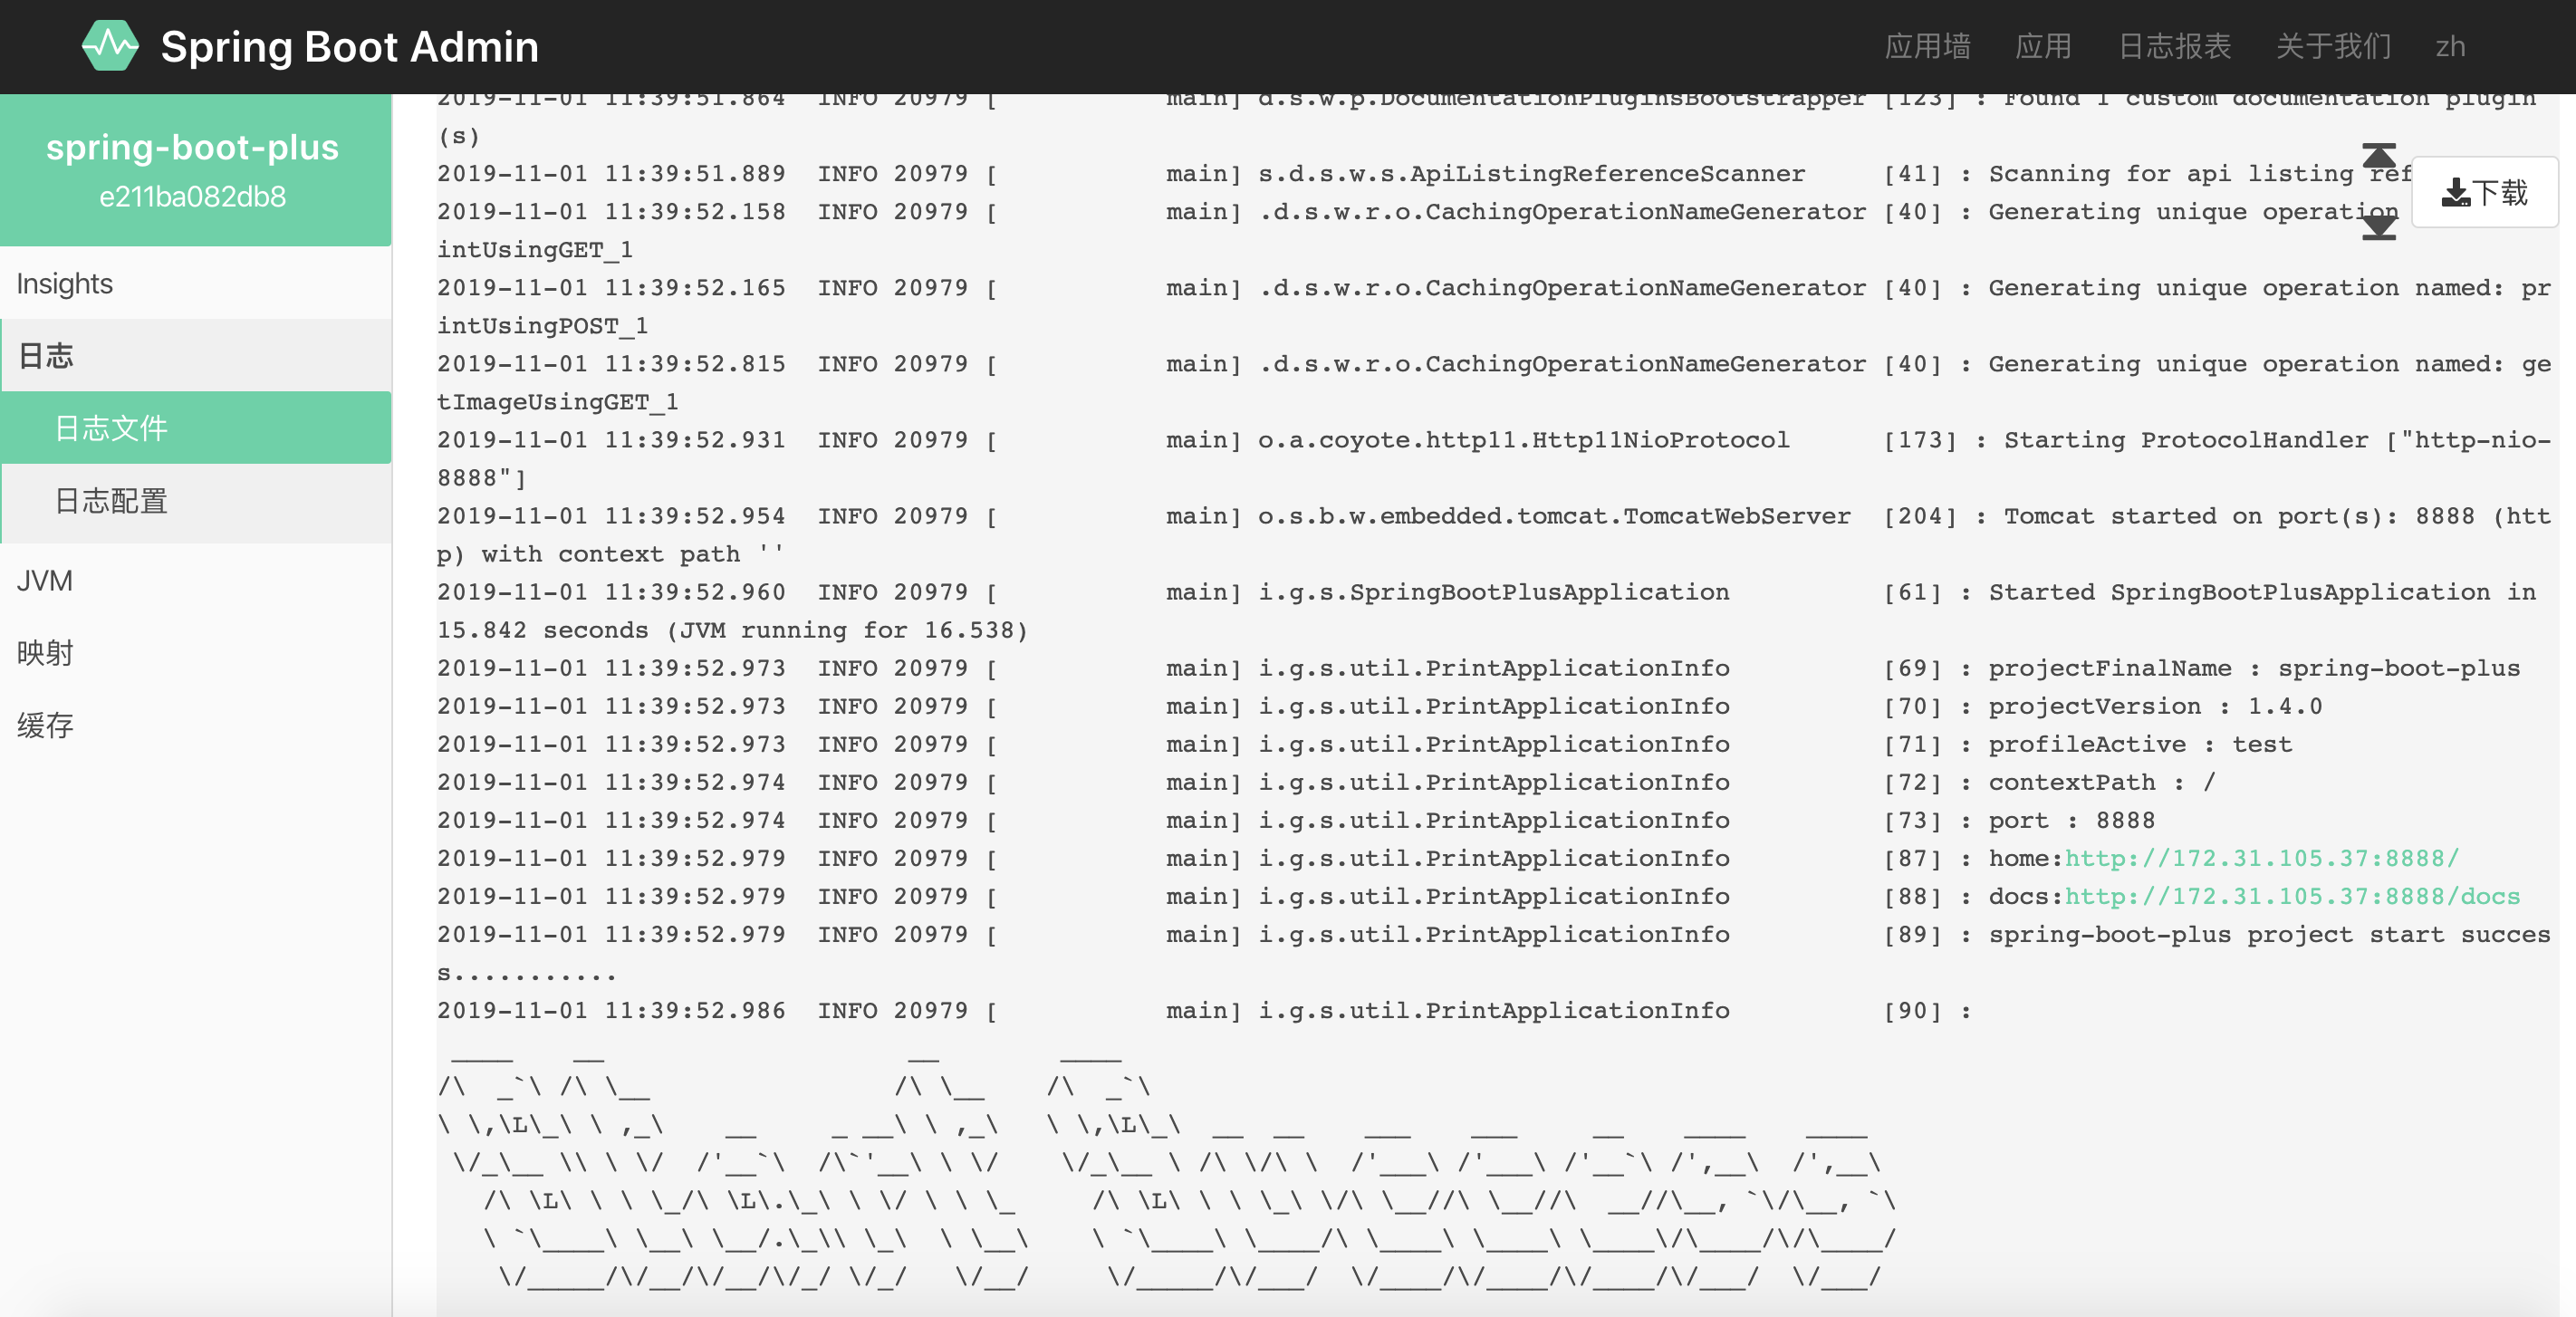
spring-boot-plus/admin/src/main/java/io/geekidea/springbootplus/admin/SpringBootPlusAdminApplication/** * Spring Boot Admin Bootstrap Main Class * * @author geekidea * @date 2020/3/20 **/@Slf4j@Configuration@EnableAutoConfiguration@EnableAdminServer@SpringBootApplicationpublic class SpringBootPlusAdminApplication { public static void main(String[] args) { ConfigurableApplicationContext context = SpringApplication.run(SpringBootPlusAdminApplication.class, args); ConfigurableEnvironment environment = context.getEnvironment(); String serverPort = environment.getProperty("server.port"); log.info("SpringBootAdmin: http://localhost:" + serverPort); }}4. 启动项目
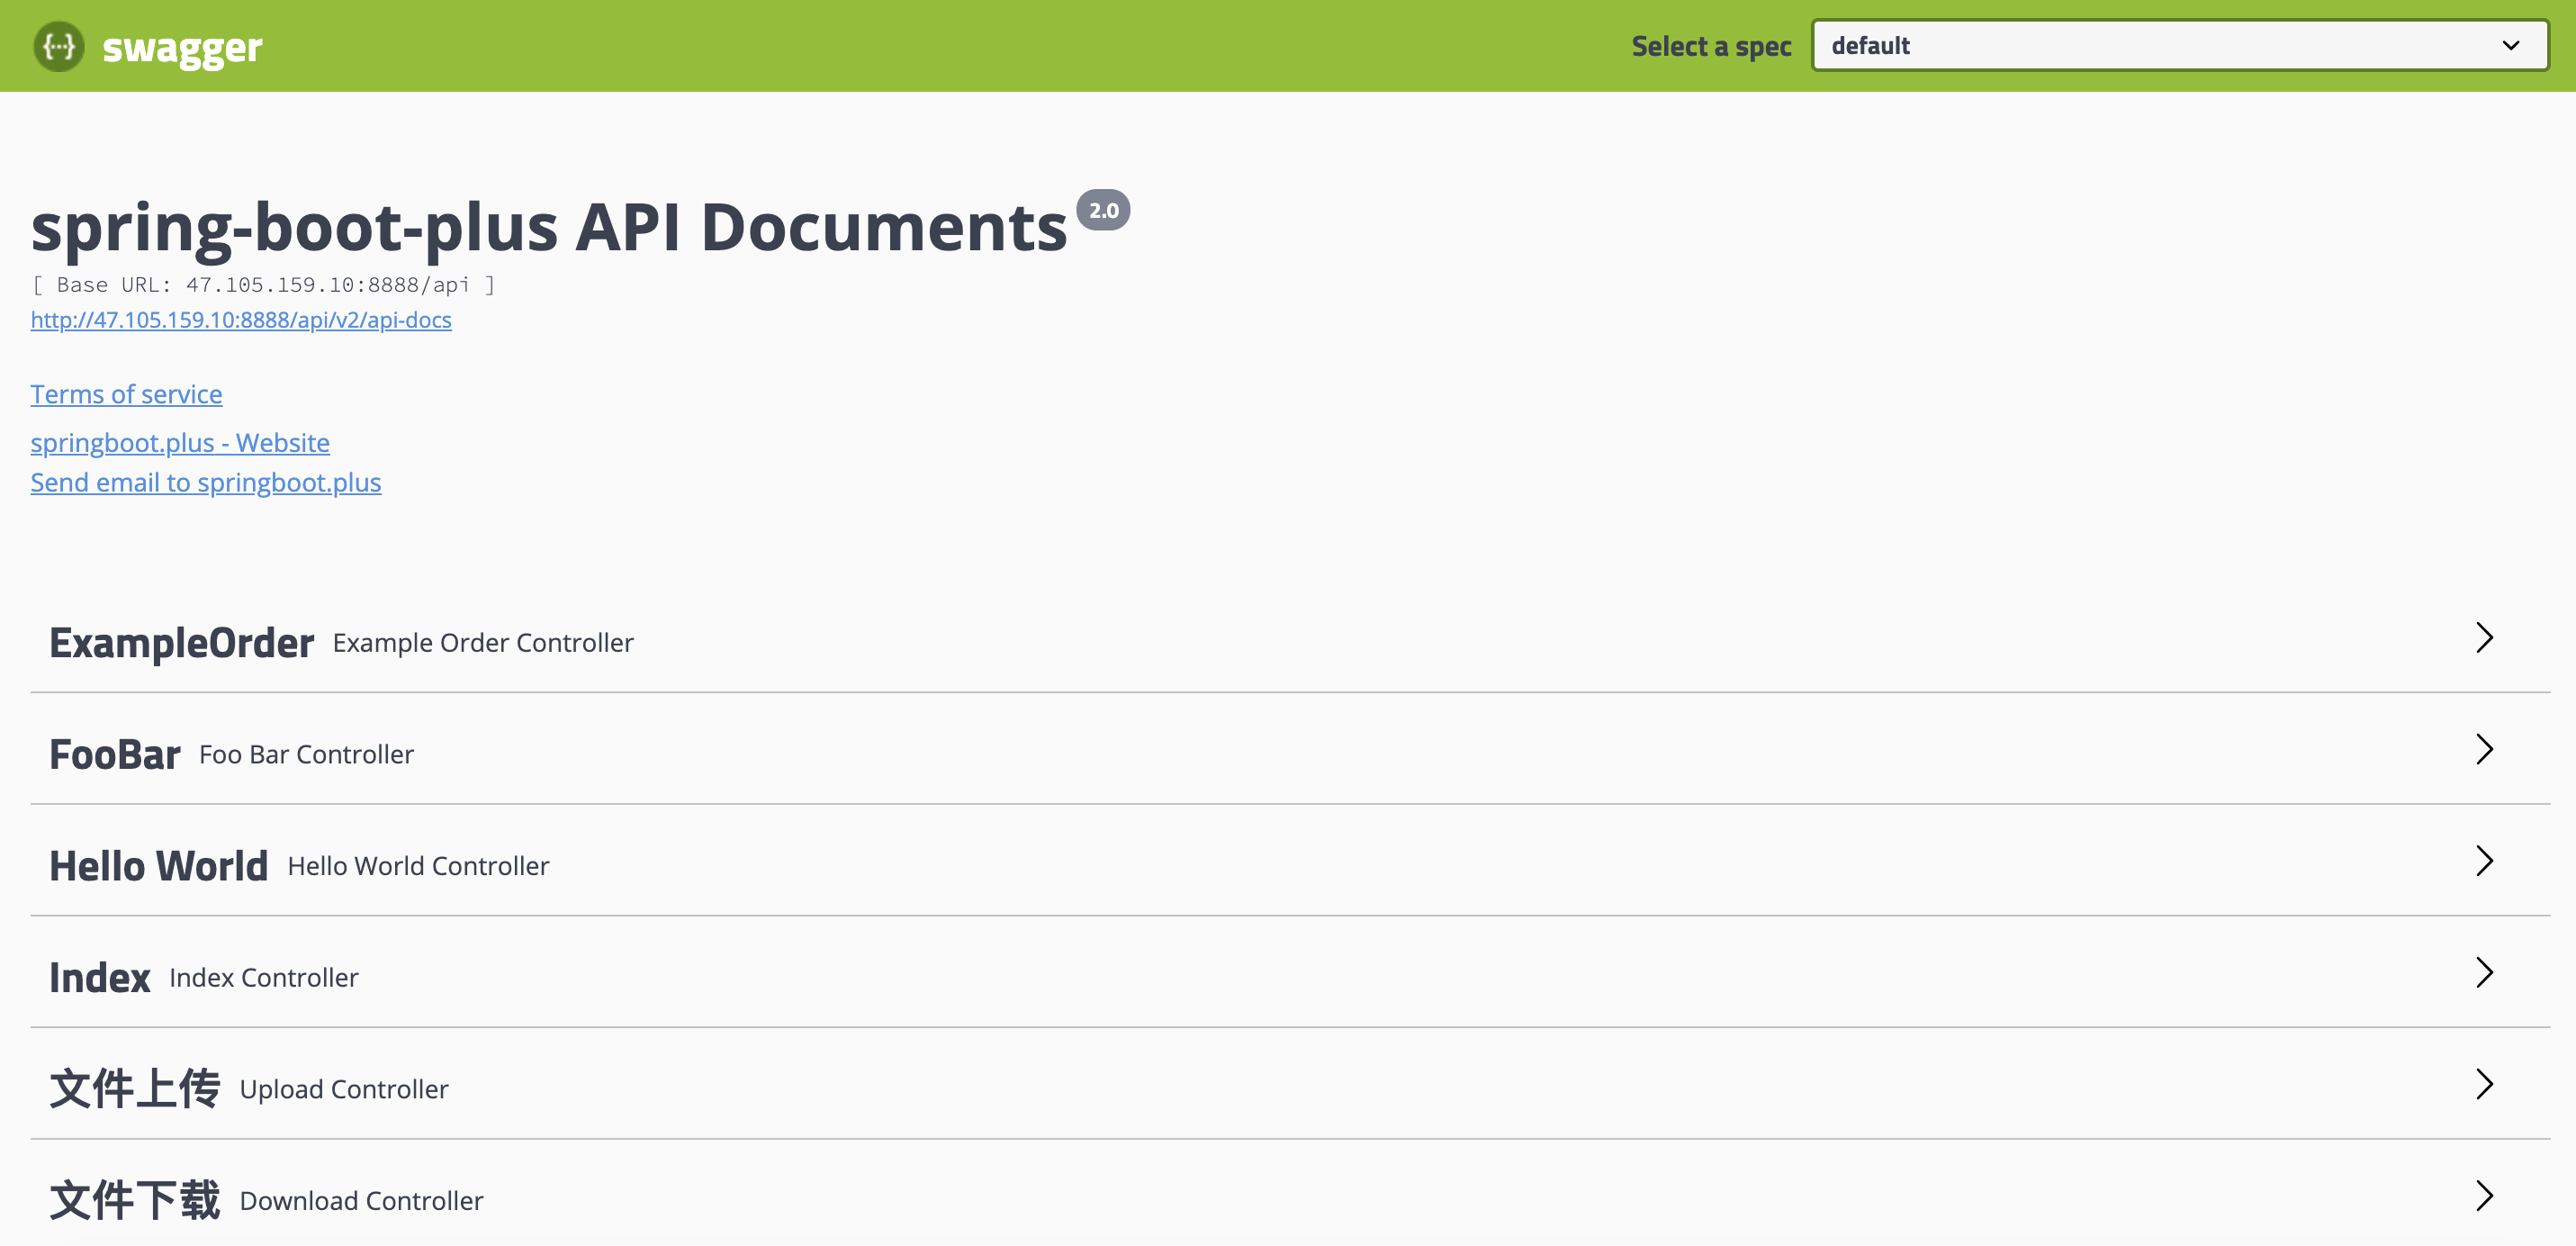
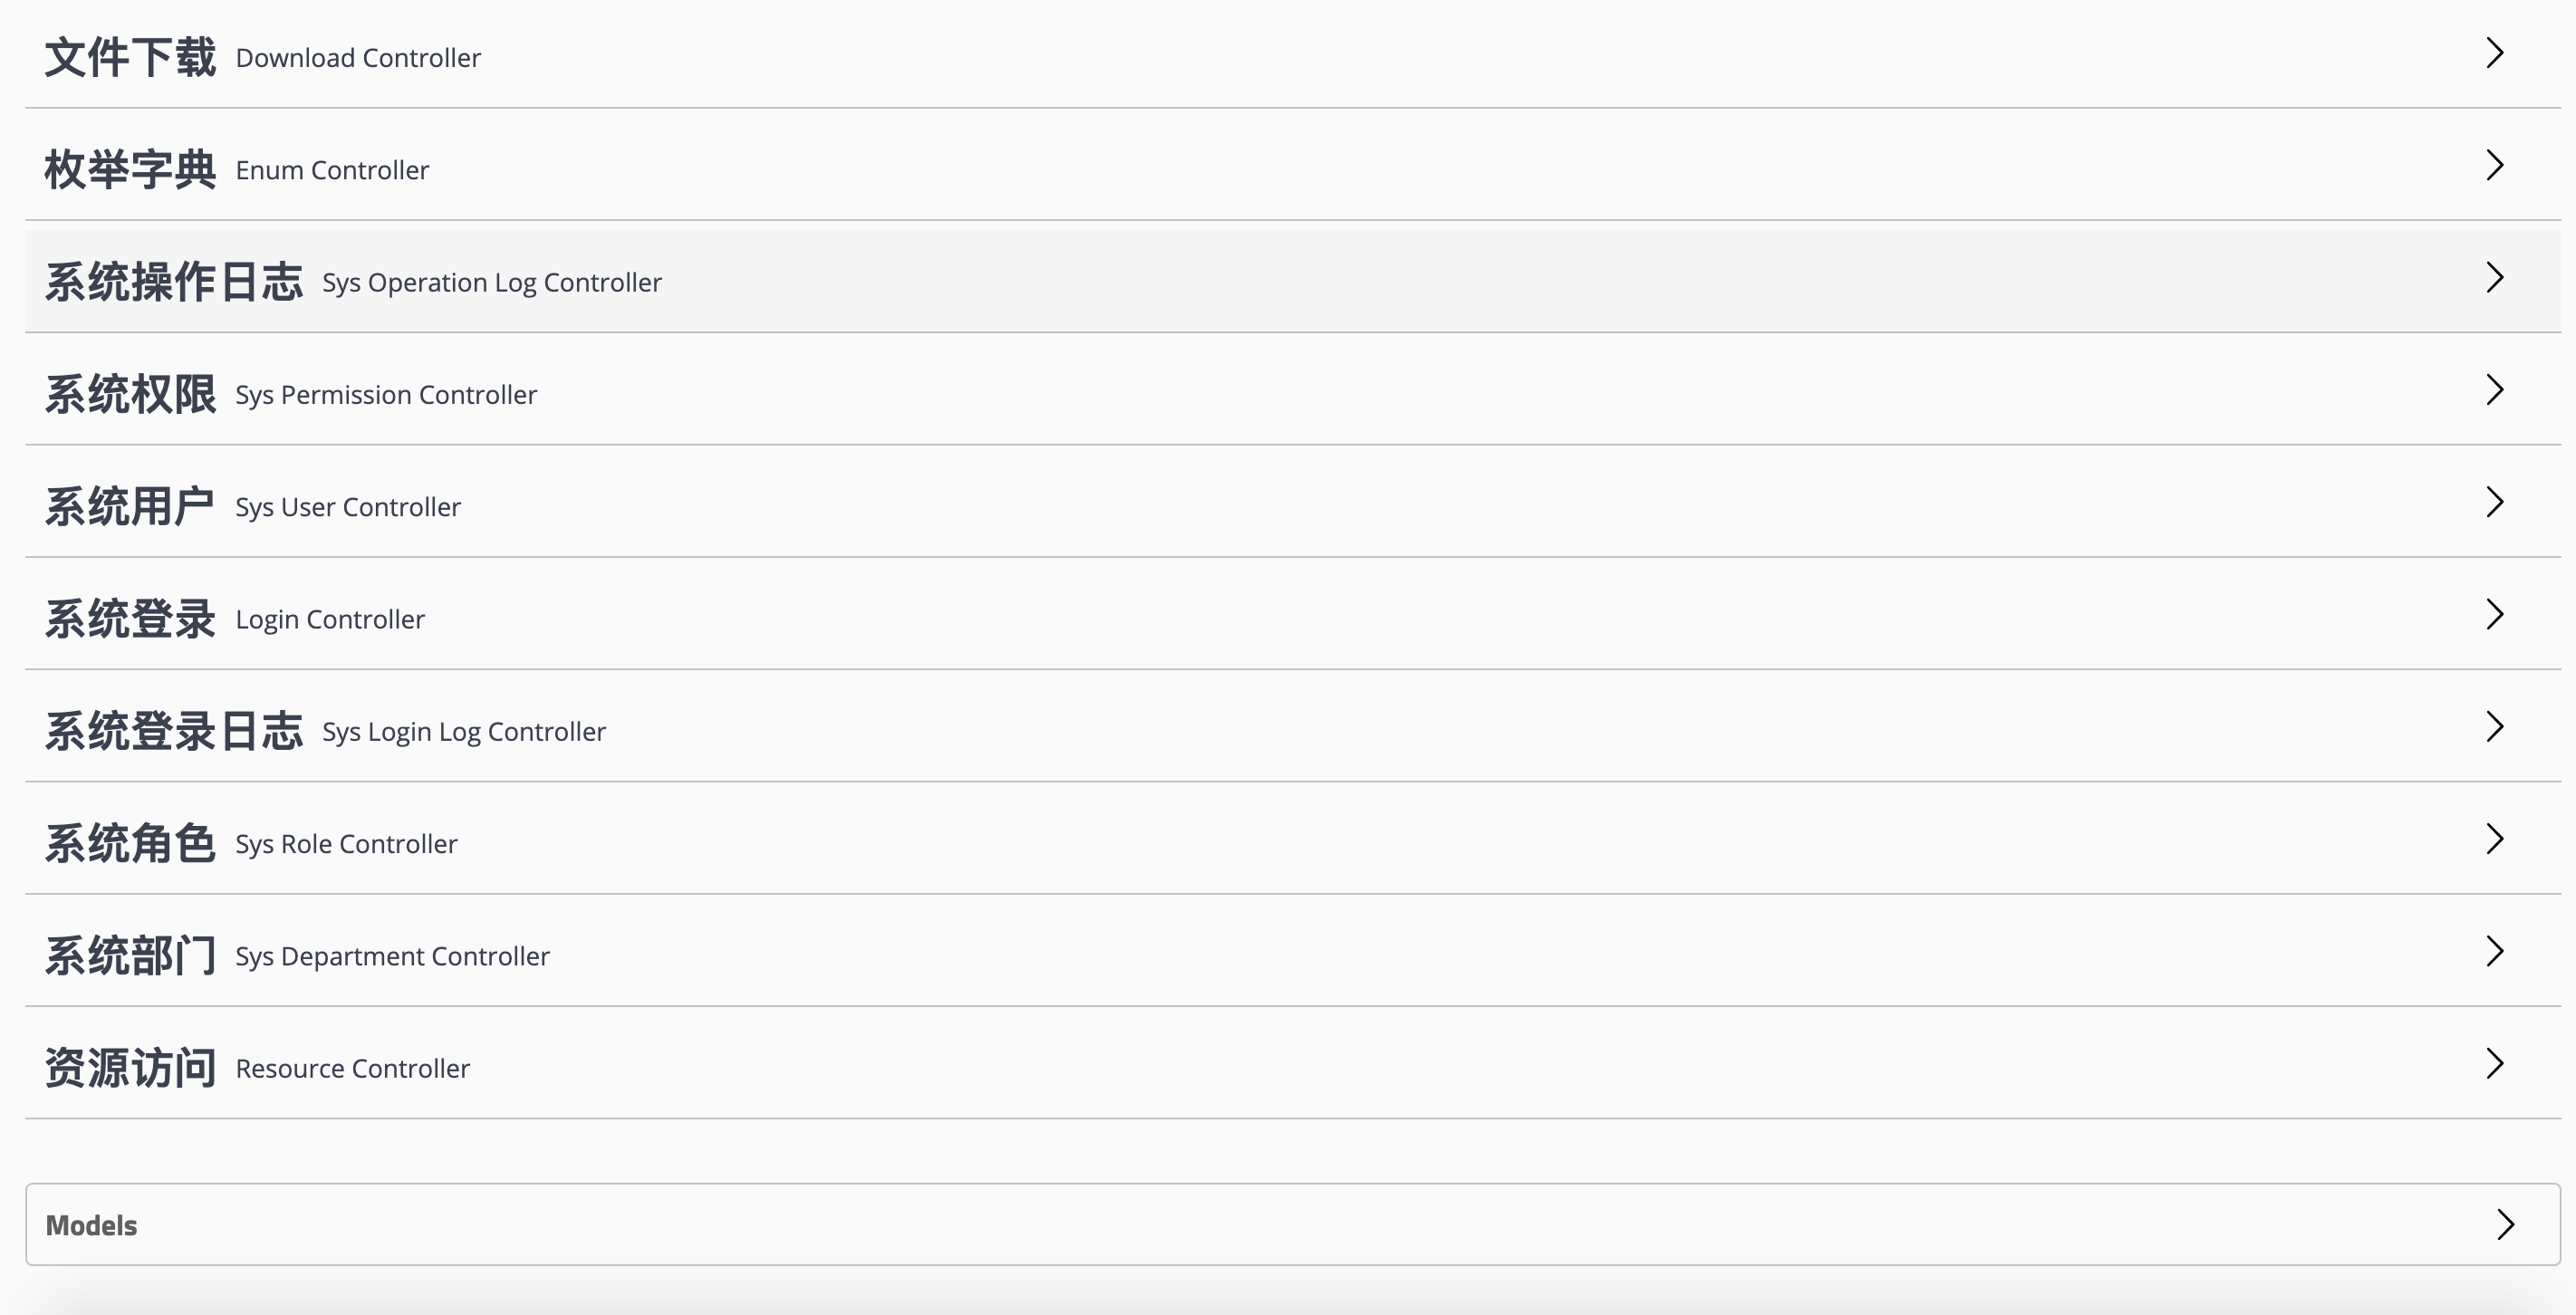
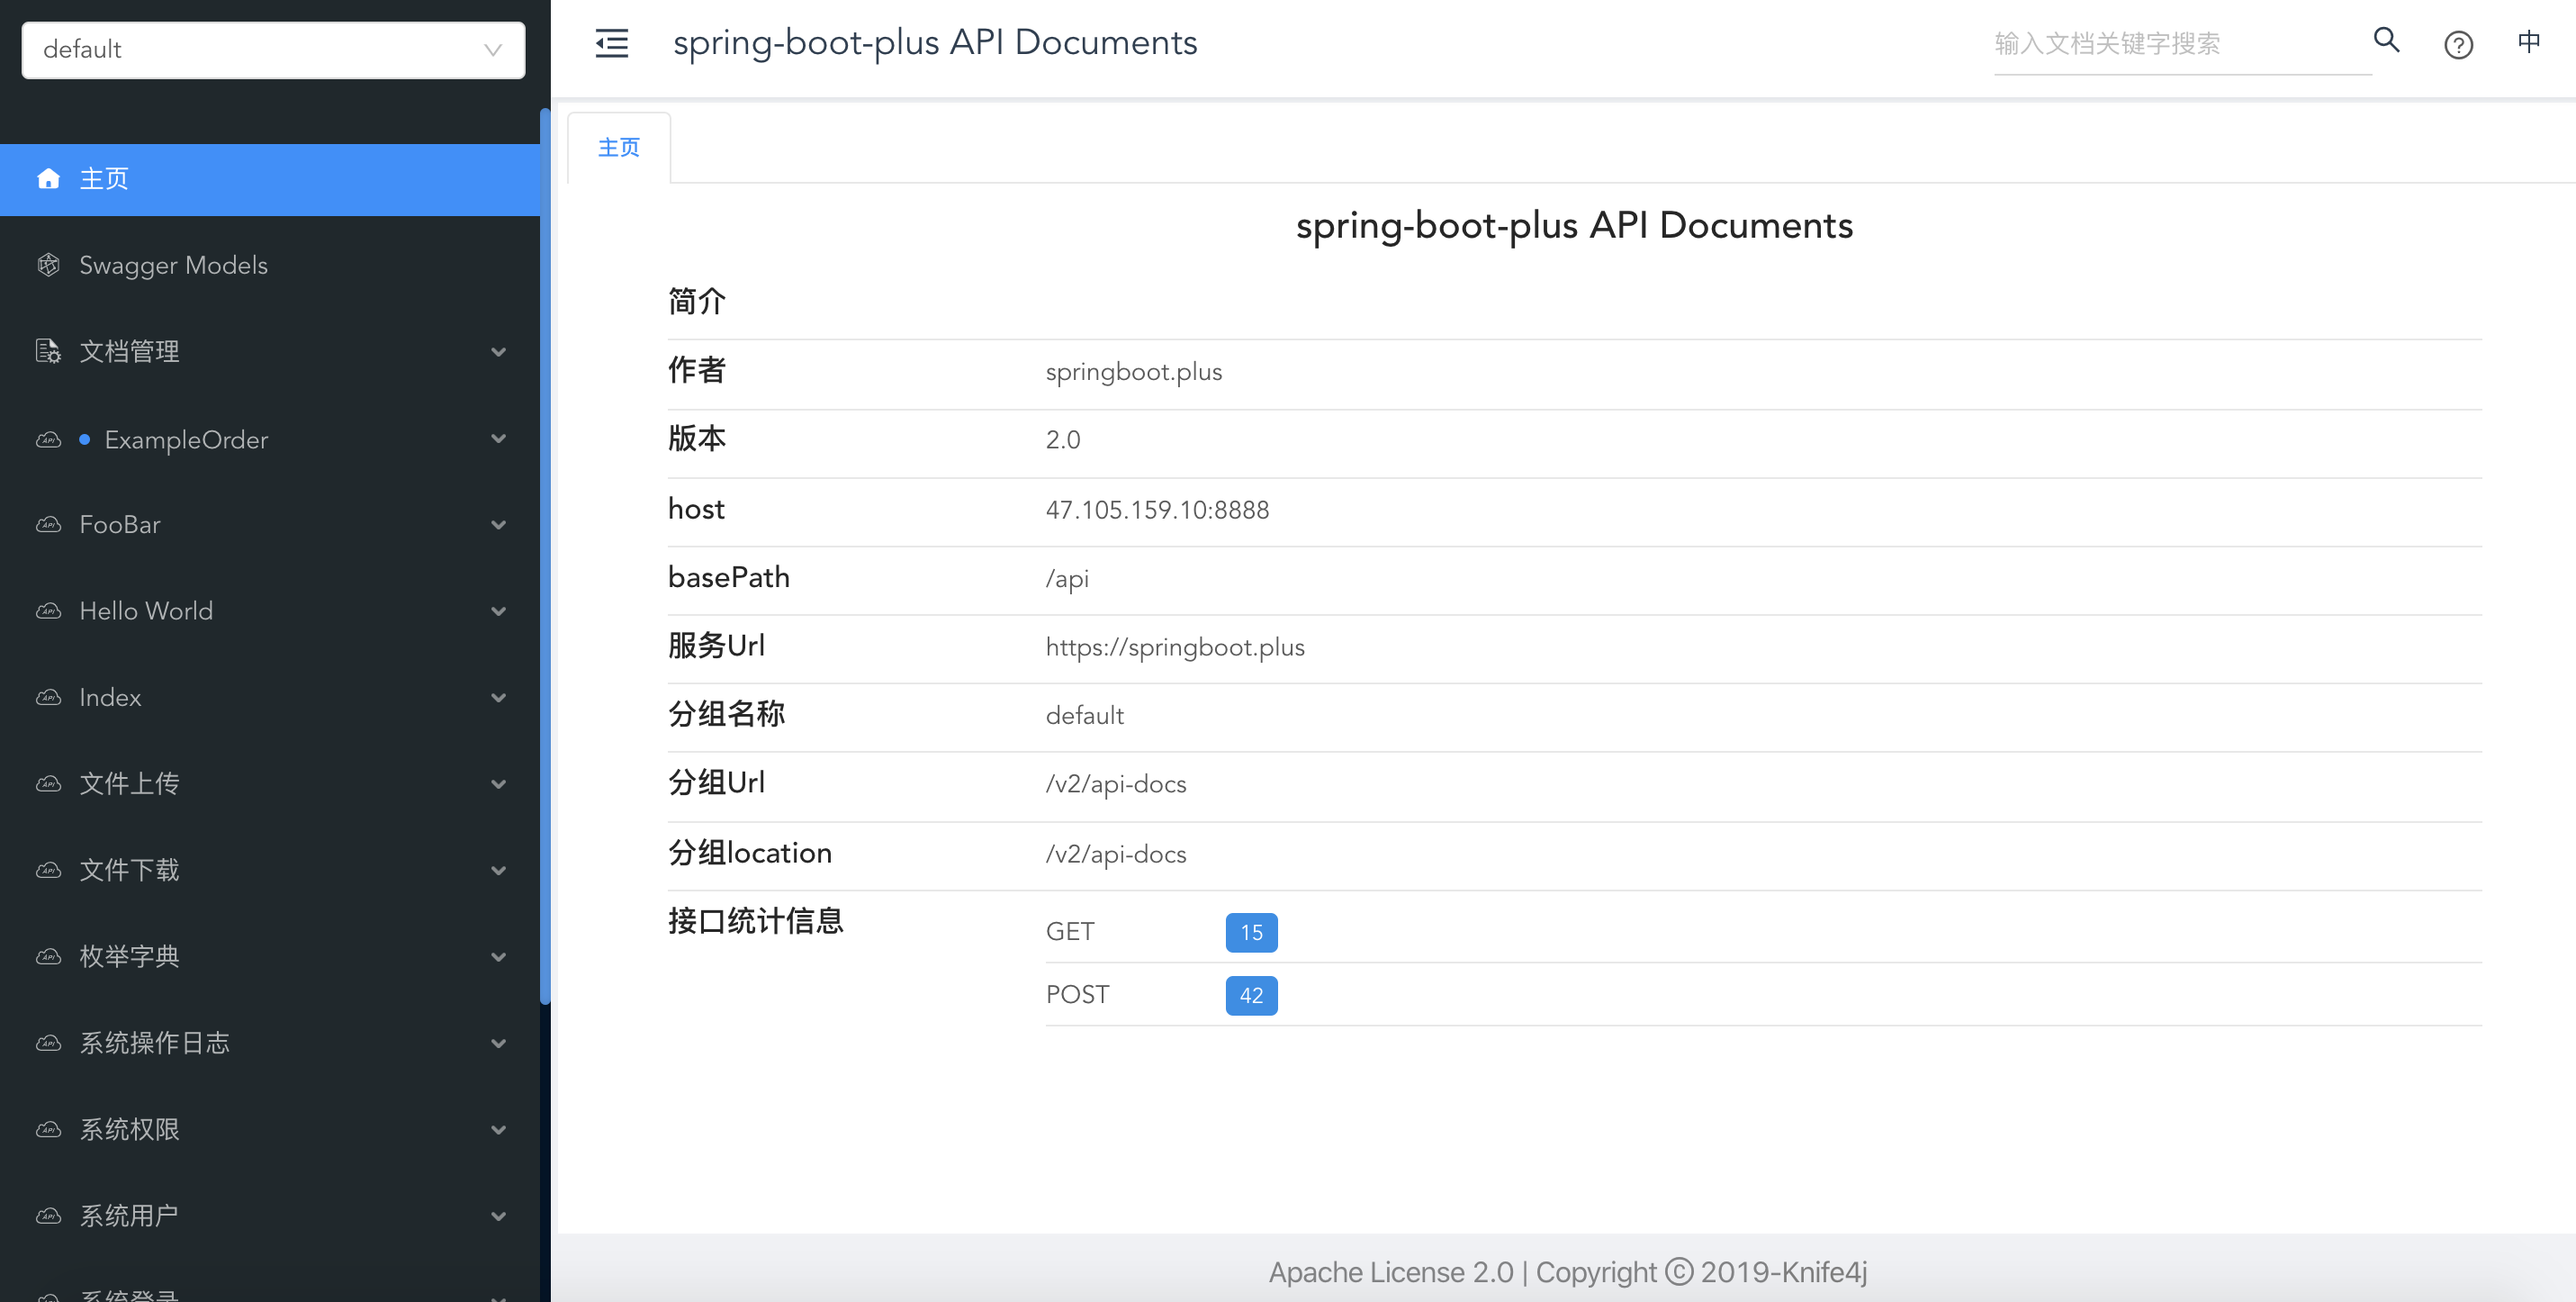
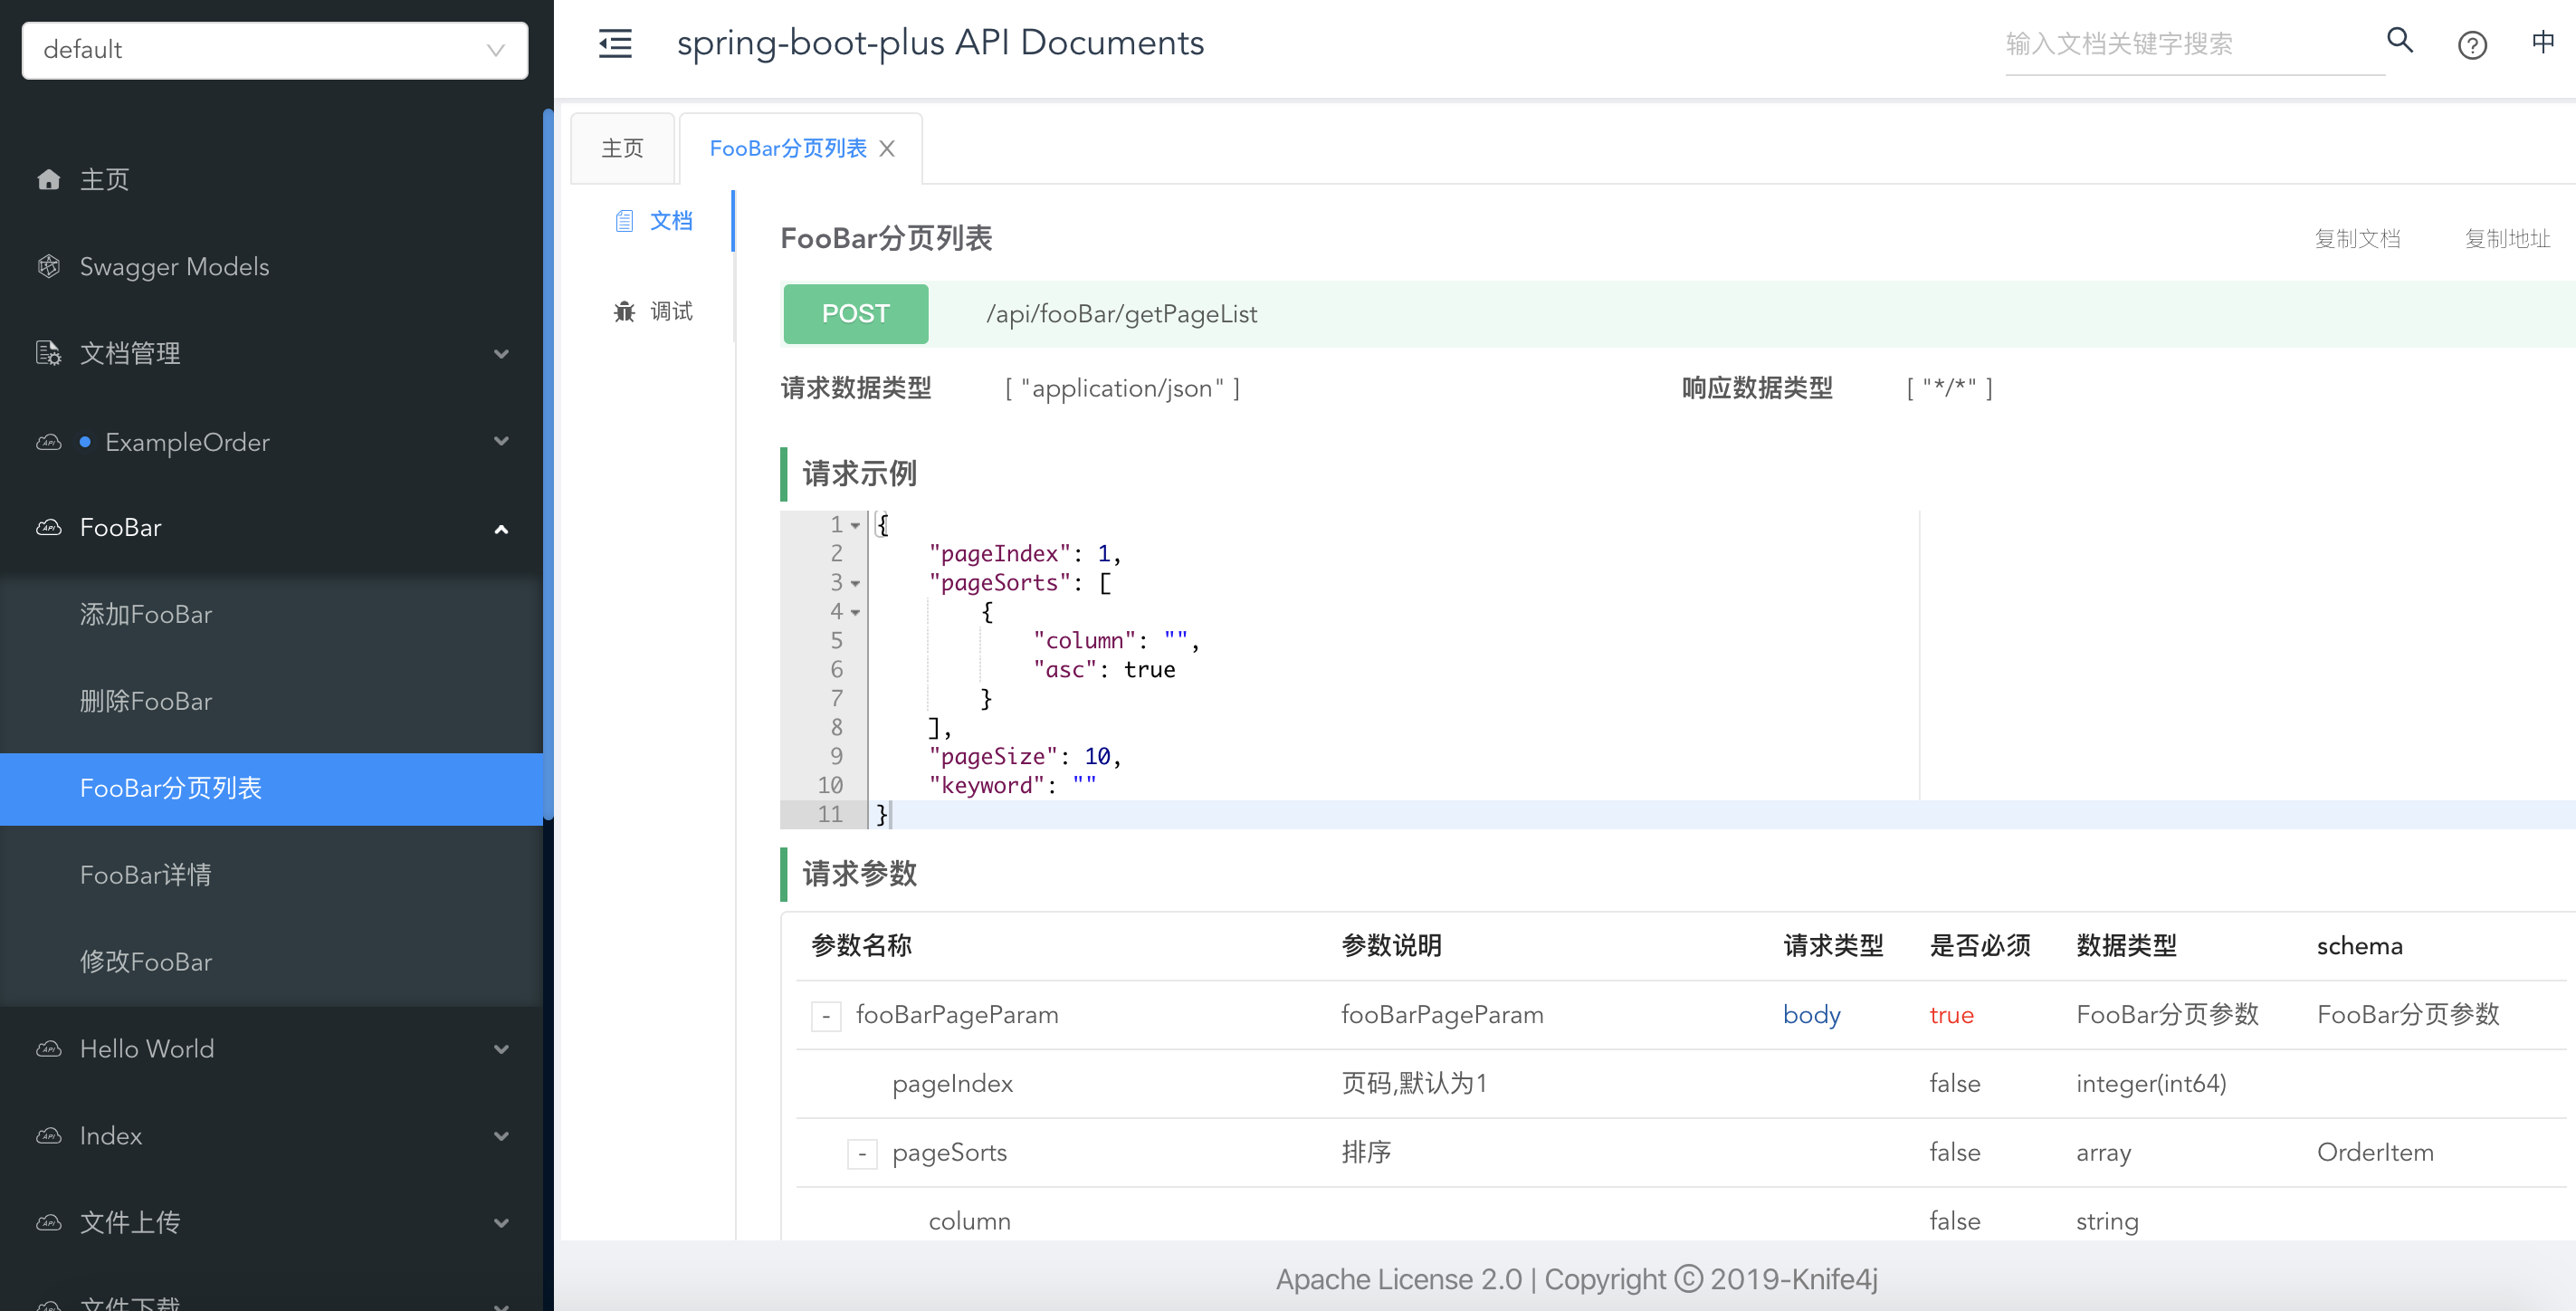
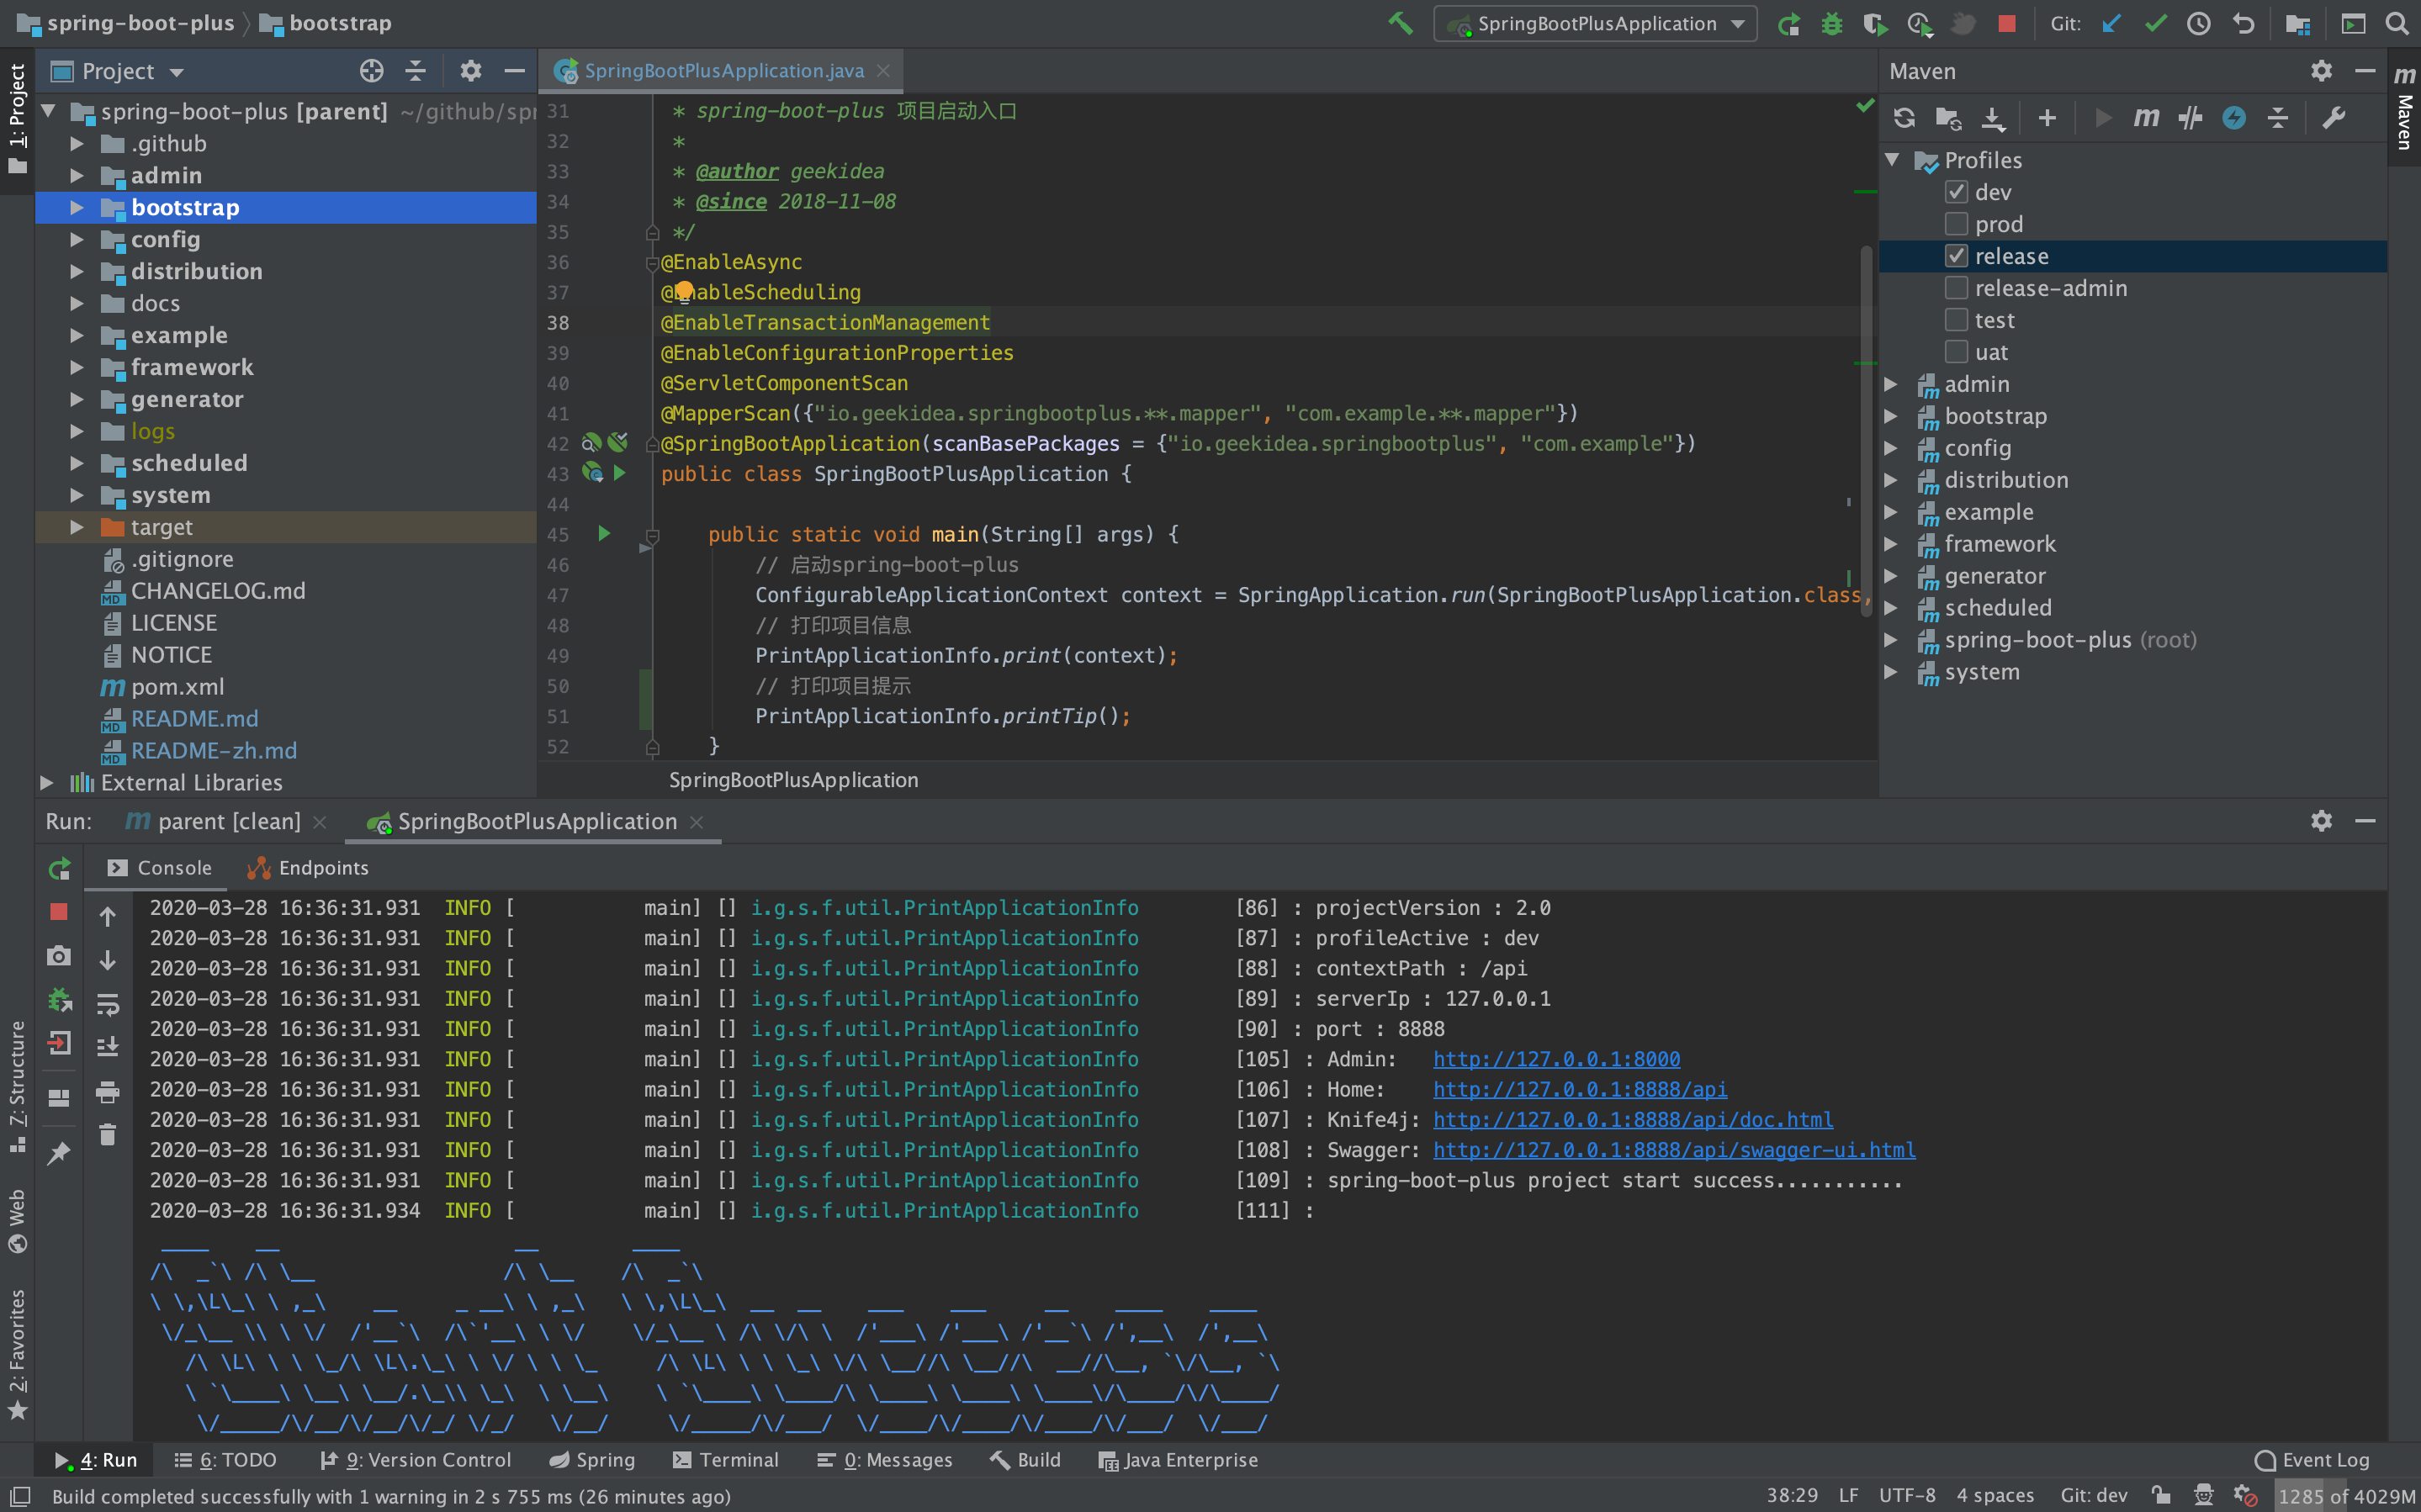
spring-boot-plus/bootstrap/src/main/java/io/geekidea/springbootplus/SpringBootPlusApplication.java/** * spring-boot-plus 项目启动入口 * * @author geekidea * @since 2018-11-08 */@EnableAsync@EnableScheduling@EnableTransactionManagement@EnableConfigurationProperties@ServletComponentScan@MapperScan({"io.geekidea.springbootplus.**.mapper", "com.example.**.mapper"})@SpringBootApplication(scanBasePackages = {"io.geekidea.springbootplus", "com.example"})public class SpringBootPlusApplication { public static void main(String[] args) { // 启动spring-boot-plus ConfigurableApplicationContext context = SpringApplication.run(SpringBootPlusApplication.class, args); // 打印项目信息 PrintApplicationInfo.print(context); // 打印项目提示 PrintApplicationInfo.printTip(context); }}5. 访问项目Swagger文档http://47.105.159.10:8888/api/swagger-ui.html 6. 访问Knife4j文档http://47.105.159.10:8888/api/doc.html CentOS快速安装环境/构建/部署/启动spring-boot-plus项目1. 下载安装脚本
wget -O download-install-all.sh https://springboot.plus/bin/download-install-all.sh2. 运行安装脚本sh download-install-all.sh3. 修改MySQL密码ALTER USER 'root'@'localhost' IDENTIFIED BY 'Springbootplus666!';exitmysql -uroot -pSpringbootplus666!4. 导入MySQL脚本create database if not exists spring_boot_plus character set utf8mb4;use spring_boot_plus;source /root/mysql_spring_boot_plus.sql;show tables;exit5. 下载部署脚本 |
| QQ 625301326 | 微信公众号 geekideaio | 今日头条 GeekIdea |
|---|---|---|
 |  |  |
请作者喝咖啡,让代码飞一会儿!

spring-boot-plus is under the Apache 2.0 license. See the LICENSE file for details.


2022-08-15
2022-08-17
2023-10-27
2022-09-23
2022-08-13

六六分期app的软件客服如何联系?不知道吗?加qq群【895510560】即可!标题:六六分期
今天小编告诉大家如何处理win10系统火狐flash插件总是崩溃的问题,可能很多用户都不知

今天小编告诉大家如何对win10系统删除桌面回收站图标进行设置,可能很多用户都不知道
今天小编告诉大家如何对win10系统电脑设置节能降温的设置方法,想必大家都遇到过需要
我们在使用xp系统的过程中,经常需要对xp系统无线网络安装向导设置进行设置,可能很多
今天小编告诉大家如何处理win7系统玩cf老是与主机连接不稳定的问题,可能很多用户都不
电脑对日常生活的重要性小编就不多说了,可是一旦碰到win7系统设置cf烟雾头的问题,很
我们在日常使用电脑的时候,有的小伙伴们可能在打开应用的时候会遇见提示应用程序无法
今天小编告诉大家如何对win7系统打开vcf文件进行设置,可能很多用户都不知道怎么对win
今天小编告诉大家如何对win10系统s4开启USB调试模式进行设置,可能很多用户都不知道怎


请发表评论